How to install Zenoss Collector
Use this procedure to install Zenoss Collector on a real or virtual Linux host.
Note
Zenoss Collector is in alpha release and might not be available in your environment. For more information, please contact your Zenoss representative.
Prerequisites
Hardware resources
- 4 CPU cores (64-bit)
- 16 GiB (16384 MiB) memory
- Approximately 2.5 GiB free space in
/optfor Zenoss Collector software - A network interface that supports TCP/IP and provides a minimum of 5 megabits per second upload capacity
- Support for Advanced Encryption Standard (AES)
Software resources
- A Linux distribution that supports MicroK8s (CentOS 7, RHEL 8, and Ubuntu 20.04 have been tested)
- A login account with superuser privileges
- Internet access (outbound TCP traffic through port 443)
- DNS support, to install required software and reach Zenoss API endpoints
Additional requirements
-
Permission to download files from delivery.zenoss.io, which can be granted to customers on request at the Zenoss Support site
-
A Zenoss API authentication key
-
Familiarity with the secret keys required to add sensitive information to Zenoss Collector's vault
Note
The commands in the installation procedures use the Bash shell. Adjust as required for other shells.
Install MicroK8s
This procedure is included for your convenience. For more information, please refer to the MicroK8s documentation.
-
Log in to the Zenoss Collector host as a user with superuser privileges.
-
(RHEL 7 hosts only) Disable the firewall.
sudo systemctl disable firewalld && sudo systemctl stop firewalld -
Install MicroK8s from the public Snap Store.
sudo snap install microk8s --classicNote
You may receive an HTTP 503 error during installation. Check the Snap Store status page for the latest information about their servers and then retry.
-
Add your account to the
microk8sgroup.sudo usermod -a -G microk8s ${USER} -
Change ownership of the caching directory, if it exists.
[[ -d ${HOME}/.kube ]] && sudo chown -f -R ${USER} ${HOME}/.kube -
Start a new shell to pick up the change in step 4.
su - ${USER} -
Verify that MicroK8s is running.
microk8s status --wait-ready
Download and unpack the distribution file
-
In a web browser, navigate to delivery.zenoss.io, and then log in.
-
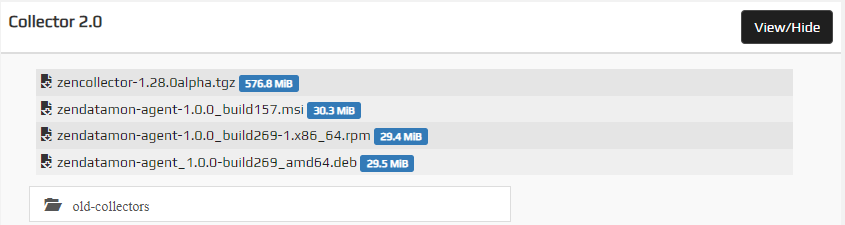
Display the Zenoss Collector distribution files.
-
Download the latest Zenoss Collector distribution file.
In the preceding example, the filename is
zencollector-1.28.0alpha.tgz. (The version number may be greater than 1.28.0.) -
If necessary, copy the file to the Zenoss Collector host, and then log in to it as a user with superuser privileges.
-
Create a directory for Zenoss Collector.
sudo mkdir /opt/zenoss && sudo chown ${USER}:${USER} /opt/zenoss -
Change directory to the new directory.
cd /opt/zenoss -
Copy or move the Zenoss Collector distribution file to the new directory.
-
Extract the package file contents.
tar --checkpoint=20000 -xzf ./zencollector*.tgz -
(Optional) Delete the distribution file.
rm -f ./zencollector*.tgz
Configure and start collector services
-
Change directory to the Zenoss Collector
bindirectory.cd /opt/zenoss/zenoss-collector/bin -
Start the configuration and startup script.
Replace
<COLLECTOR_NAME>with a unique name for this Zenoss Collector instance in your environment:./setupCollector.sh -c /opt/zenoss/config/zdatamon -i <COLLECTOR_NAME>The script runs for approximately 3-5 minutes and does not require input.
-
Verify that the services are running.
microk8s.kubectl get podsOn success, the result looks like the following example:
NAME                                    READY   STATUS    RESTARTS   AGE
vault-agent-injector-6687859c6d-zrhzc   1/1     Running   0          7m29s
zvaultmon-86db664496-lnsht              1/1     Running   0          5m49s
vault-0                                 1/1     Running   0          7m28s
zminihub-67f7f589dc-lfbrk               1/1     Running   0          5m36s
zdatamonconfig-75bb69b7fd-zbflh         2/2     Running   0          6m18s
zdatamon-794f464cfc-xg65q               2/2     Running   0          6m8s
zenpython-8677687c6f-7w8qf              1/1     Running   0          5m15s
zenperfsnmp-5b4db769d6-s4xgw            1/1     Running   0          5m4s
zenmodeler-5969cf8f8c-wdqhw             1/1     Running   0          4m53s
zencommand-5b797866d6-mhqzq             1/1     Running   0          4m43s
zenping-7cc4fb9b85-prfc9                1/1     Running   0          4m32s
Enable communication with Zenoss Cloud
-
Open
/opt/zenoss/config/zdatamon/agent.yamlwith a text editor. -
Add your tenant name.
In the
datasinkssection, replace<REPLACE_WITH_TENANT_NAME>with your organization's tenant name. For example, if your tenant name isacme, then the result is as follows:- name: acme.zenoss.io -
Add your API endpoint.
Replace
<REPLACE_WITH_STACK>.zenoss.iowith your organization's API endpoint. For example, if your organization's stack is EMEA, then the result is as follows:address: api.zenoss.eu:443 -
Configure the authentication key field.
Replace
<REPLACE_WITH_APIKEY_SECRET>with a secret key. For example:apiKey: _ZDM_SEC_collector1.apiKey -
Review the file.
Here is an example
datasinkssection:datasinks: - name: mytenant.zenoss.io type: zenoss conf: address: 'api.zenoss.io:443' apiKey: _ZDM_SEC_collector1.apiKey - name: debug type: zenoss conf: logOnly: true -
Save
/opt/zenoss/config/zdatamon/agent.yamland close the text editor. -
Validate the file.
For example, use an online YAML validator to ensure the file is correct.
Configure monitoring targets
Use the zenoss-zenpackadapter.datasource.yaml file to configure the monitoring
targets of a ZenPack Adapter instance. Configure zProperties in the file when a
property has no default value or you want to change the default value.
Note
You can monitor any number of devices. However, monitoring many devices may require more host resources than the required minimums.
Repeat this procedure for each EMC and NetApp device you wish to monitor.
-
Change directory to the datasource configuration directory.
cd /opt/zenoss/config/zdatamon/configs -
Open
zenoss-zenpackadapter.datasource.yamlwith a text editor. -
In the devices area, remove the comments from a device template.
The result should look similar to the following example:
<DEVICE1_ID>: title: <DEVICE1_TITLE> device_class: <DEVICE1_CLASS> manageIp: <IP_ADDRESS_FOR_THIS_DEVICE> zProperties: zWBEMUsername: _ZDM_SEC_<USERNAME_SECRET_FOR_DEVICE1> zWBEMPassword: _ZDM_SEC_<PASSWORD_SECRET_FOR_DEVICE1> -
Add a unique ID for the device.
Replace
<DEVICE1_ID>with a unique ID. Often, the FQDN of the device is used as the ID, but you can use any string. -
(Optional) Add a title (name) for the device.
Replace
<DEVICE1_TITLE>with an alternate name for the device. If you do not provide a title, the device ID is used as the title. -
Add a device class for the device.
Replace
<DEVICE1_CLASS>with a device class. For example,/Storage/EMC/VMAX. -
Add the IP address of the device.
Both IPv4 and IPv6 addresses are supported.
-
In the
zPropertiesarea, add any required or optional properties for the device.Here is a sample device section:
my-emc.example.com: title: My VNX device_class: /Storage/EMC/VNX manageIp: 198.51.100.34 zProperties: zWBEMUsername: _ZDM_SEC_collector1.my-emc.example.com.zWBEMUsername zWBEMPassword: _ZDM_SEC_collector1.my-emc.example.com.zWBEMPassword zWBEMPort: 5991 -
Save
zenoss-zenpackadapter.datasource.yamland close the text editor. -
Validate the file.
For example, use an online YAML validator to ensure the file is correct.
Add secrets to the vault
-
Change directory to the configuration directory.
cd /opt/zenoss/config/zdatamon -
Create a secrets file with restricted permissions.
touch ${HOME}/.zc-secrets && chmod 0600 ${HOME}/.zc-secrets -
Add your secret keys to the secrets file.
awk '/:[ ]*_ZDM_SEC_[^\< ]/ { \ split($2,x,"_ZDM_SEC_"); \ printf("%s=\n", x[2]) }' \ agent.yaml \ configs/zenoss-zenpackadapter.datasource.yaml \ > ${HOME}/.zc-secrets -
Open the secrets file with a text editor and add values for each key.
-
Save the secrets file and close the text editor.
-
Change directory to the Zenoss Collector
bindirectory.cd /opt/zenoss/zenoss-collector/bin -
Upload your secrets to the vault.
./addConfigSecrets.sh -f ${HOME}/.zc-secrets -
Delete the secrets file.
rm -f ${HOME}/.zc-secrets
Begin monitoring
-
Change directory to the Zenoss Collector
bindirectory.cd /opt/zenoss/zenoss-collector/bin -
Display the devices in your datasource configuration file.
myPath='/opt/zenoss/config/zdatamon/configs' grep -A 999 -E 'devices:' ${myPath}/zenoss-zenpackadapter.datasource.yaml -
Initiate monitoring for each device.
Replace
<DEVICE_ID>with a device ID from the previous step:./remodelDevice.sh <DEVICE_ID>Repeat the command for each device in your datasource configuration file.