Enabling user access
Virtana Service Observability provides a native user management feature and supports integrations with popular services like Google G Suite and Microsoft Active Directory, through the Auth0 Single Sign On (SSO) service. For more information about integrating an identity management service, please contact your Virtana Services representative.
Tip
The Virtana Service Observability API includes resources for the user management service.
Managing users
You can use the native identity management feature of Virtana Service Observability to create and manage user accounts.
Note
The users and groups you create with the native identity management feature can be synchronized to all your Collection Zones automatically. However, groups are not synchronized until they include at least one user and that user logs in. Also, synchronization is delayed when a Collection Zone is offline.
Creating a new user
To perform this procedure, at least one user group must be defined. For more information, see Managing groups.
To create a new user, follow these steps:
-
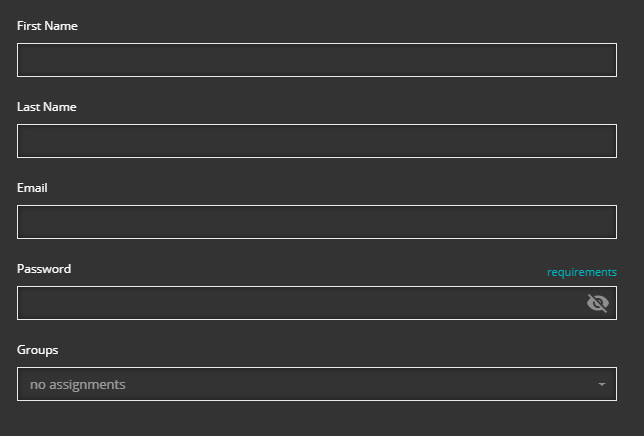
Navigate to ADMIN > Users & Groups.
-
On the USERS tab, click ADD USER.
-
In the First Name and Last Name fields, enter the new user's name.
-
In the Email field, enter a valid email address for the user.
Virtana Service Observability sends a verification email to the address upon completion of the form, which requires resetting the initial password.
-
In the Password field, enter a password. Passwords must be a minimum of 8 characters, with no more than two identical characters in a row, and must include at least one character from three of the following classes:
- Special characters (! @ # $ % ^ & *)
- Lower-case letters (a-z)
- Upper-case letters (A-Z)
- Digits (0-9)
-
From the Groups list, assign one or more groups to the new user.
For more information about user groups, see the next section.
-
-
In the upper-right corner of the window, click SAVE.
The passwords of user accounts managed by the native identity management feature of Virtana Service Observability do not expire. Users can initiate a password reset at any time by using the login dialog box.
Managing groups
Virtana Service Observability manages users as members of groups, not as individuals. To enable access, create a Virtana Service Observability group name that matches a group name in your identity service, and then assign application roles to the groups.
Users in multiple groups get all the roles and restriction filters associated with the groups to which they belong. For example:
-
Group A is assigned the ZenOperator role in Collection Zone "Central" and the User role in Virtana Service Observability.
-
Group B is assigned the ZenManager role in Collection Zone "Central" and the Manager role in Virtana Service Observability.
Users who are members of both group A and group B receive the ZenOperator and ZenManager roles in Collection Zone "Central", and the User and Manager roles in Virtana Service Observability.
Note
Users with multiple roles get all the privileges associated with each role. For example, if a user has both the User and Key Administrator roles in Virtana Service Observability, that user has the privileges of both roles.
Creating a new group
Follow these steps to create a new group.
-
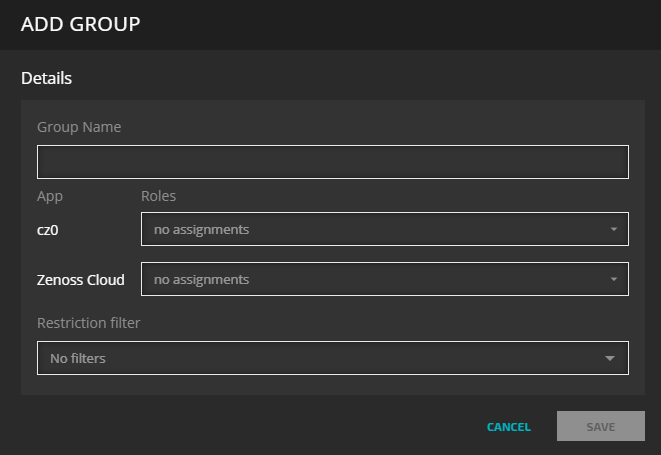
In Virtana Service Observability, navigate to ADMIN > Users & Groups.
-
On the GROUPS tab, click ADD GROUP.
-
In the Group Name field, enter a group name.
Group names may not include the colon (
:), left curly bracket ({), or right curly bracket (}) characters. -
(Optional) Add roles to one or more Collection Zones and to Virtana Service Observability.
The users associated with a group cannot gain access to Virtana Service Observability until at least one role is assigned. For more information, see Roles and permissions.
-
(Optional) Add one or more restriction filters.
-
(Optional) Choose any shared dashboard, event view, or inventory view for the group.
When users in the group navigate to Dashboards, Events, and Inventory, the view selected here will open. Views entered here override any views selected in System Preferences for users in the group.
Note
If users are members of multiple groups that have default views assigned, they will see the default view selected in the first group determined by alphabetical order.
-
In the bottom-right corner, click SAVE.
Restriction filters
A restriction filter specifies the sources of entities that you can view in Dashboards, Smart View, Events, and Inventory. You can define restriction filters for groups so all members in the group are affected by the filter.
Restriction filters are independent of Collection Zone roles. For example, if a group includes the Delegate to Collection Zone role with specific administered objects, you must mirror the settings in a restriction filter.
Set a restriction filter
To specify a restriction filter, perform the following steps:
-
In the ADD GROUP dialog box, click the Restriction filter field.

-
From the dropdown list of sources, select a Collection Zone or one or more streaming data sources.
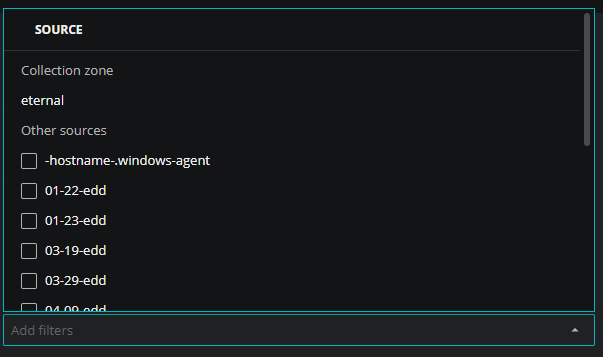
When you select a Collection Zone, you can also select one or more organizers.
Organizers are added to the filter list as you select them. Each selected organizer includes all of its subordinate organizers as well.
-
Click SAVE.
Scenario: Creating user groups
In this scenario, you are a Virtana Service Observability administrator for ZennyCorp, a fictious IT service company. As part of the Virtana Service Observability deployment at ZennyCorp, you have been tasked with managing user access for the following groups:
- Fellow Virtana Service Observability admins on your team who need complete read/write access.
- Network Operations Center (NOC) users who need read-only access.
- A DevOps group who need read-only access to entities in the Collection Zone's /Groups/DevOps organizer.
- A team of ZennyCorp network administrators who need read/write access, but only to entities in the Collection Zone's /Devices/Network organizer.
Create a group for Virtana Service Observability administrators
Since you're already a Virtana Service Observability admin, you're logged in as a member of ZennyCorp's existing ZenossCloudAdmin user group. Before creating any other groups, check the roles and restriction filters assigned to your group:
-
Log in to ZennyCorp's Virtana Service Observability tenant.
-
In the header, click ADMIN, then Users & Groups. Click the Groups tab.
-
Locate the ZenossCloudAdmins group and click Group details (eye icon) to open the details panel for the group. In the General information section, check that the following information appears:
- Group name:
ZenossCloudAdmins - Roles
- Collection Zone (cz0):
ZenManager - Virtana Service Observability:
Manager
- Collection Zone (cz0):
- Restriction filter
None
- Group name:
These roles provide you and your colleagues with read/write access to ZennyCorp's Virtana Service Observability tenant and your Collection Zone. Let's move on to the next task.
Create a group for Network Operations Center (NOC) users
The NOC users need global read-only access to Virtana Service Observability and the Collection Zone. Perform the following actions:
-
Since you're already on the Admin > Users & Groups > Groups page, click Add Group.
-
Enter the following information:
- Group name:
NOCOperators - Roles
- Collection Zone (cz0):
ZenUser - Virtana Service Observability:
Read Only User
- Collection Zone (cz0):
- Restriction filter
None
- Group name:
-
Click Save to create the group.
Create a group for the DevOps team
The DevOps team need specific read-only access. They want to see (but not edit) entities in the /Groups/DevOps organizer of the Collection Zone.
-
Since you're already on the Admin > Users & Groups > Groups page, click Add Group.
-
Enter the following information:
- Group name:
DevOps - Roles
- Collection Zone (cz0):
Delegate to Collection Zone - Virtana Service Observability:
Read Only User
- Collection Zone (cz0):
- Restriction filter
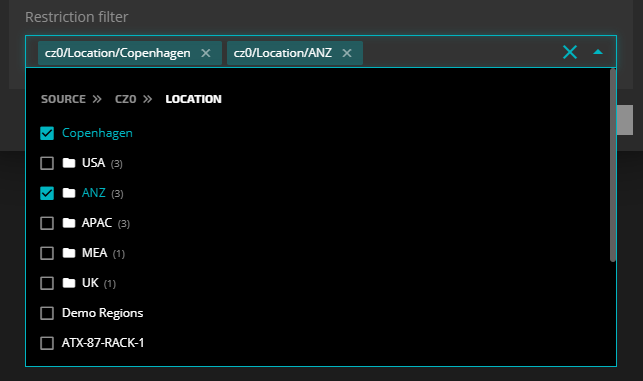
cz0/Groups/DevOps
- Group name:
-
Click Save to create the group.
-
For the Delegate to Collection Zone role to provide the correctly restricted access, a Collection Zone user group must exist with the following properties:
- The group name must exactly match the Virtana Service Observability user group.
- The group must have the /Groups/DevOps organizer provisioned as an Administered Object with the ZenUser role.
This group is automatically created and provisioned as soon as the first user in the Virtana Service Observability DevOps group logs in.
No further action is required so you can move on to the next task.
Create a group for Network administrators
The network administrator users are a special case. They need the following:
- Global read-only access like the NOCOperators group.
- Restricted access like the DevOps group.
- Elevated access like the ZenossCloudAdmin group, but only within their restrictions.
You recall the rules of group membership:
- Users can belong to multiple groups.
- Roles granted by multiple groups are additive.
- Collection Zone user groups can be created and provisioned manually.
You can add the network admins to the NOCOperators group to provide the required global read-only roles and you can create a network admins group restricted to the Collection Zone's /Devices/Network organizer. Finally, instead of waiting for the system to create the Collection Zone user group with the ZenUser role, you choose to create it manually and provision the /Devices/Network organizer with the ZenManager role.
You can take the following steps:
-
Since you're already on the Admin > Users & Groups > Groups page, click Add Group.
-
Enter the following details:
- Group name:
NetworkAdmins - Roles
- Collection Zone (cz0):
Delegate to Collection Zone - Virtana Service Observability:
Manager
- Collection Zone (cz0):
- Restriction filter
cz0/Devices/Network
- Group name:
-
Click Save to create the group.
-
In the header, click EXPLORE CZ to go to the Collection Zone.
-
In the CZ header, click ADVANCED then SETTINGS, and then click Users in the sidebar.
-
Create the Collection Zone user group. Click the GROUPS button (gear icon) to open the dropdown menu and and select Add New Group....
-
Provide the same group name as you did for
NetworkAdminsand click OK. -
Click the group name, then click Administered Objects in the sidebar. Click the ADMINISTERED OBJECTS gear icon to open the dropdown menu and select Add Device Class.... The Add Administered Device Class dialog box opens.
-
In the Device Class field, select
/Networkin the dropdown meny, then click OK. Finally, open the Role column dropdown menu and select ZenManager. Click Save.