Discovering devices
Using network or IP address range information that you provide, Collection Zone performs processing to discover your devices.
During the discovery process, Collection Zone:
- Iterates through every IP address in the networks and IP ranges that you specify.
- Adds each device that responds to a ping request.
- Adds information to any device that responds to an SNMP, WinRM, or SSH request.
- Based on configuration settings, assigns devices to device classes.
Note
For a discovered device to be assigned to a device class that matches its hardware and operating system, the zDiscoveryMappingOn configuration setting on the /Discovered device class must be enabled. If the setting is disabled, discovered devices remain in the /Discovered device class, and you can manually classify them.
Discovery mapping
Discovery mapping is the process by which Collection Zone automatically assigns a discovered device to a device class based on priority values that you set. Priority values provide the device characteristics that Collection Zone uses to select the device class. Devices are categorized by hardware type or operating system, as follows:
- If the hardware field is set, the device is assigned to the device class that is associated with that hardware type in the manufacturer settings.
- If the operating system field is set, the device is assigned to the device class that is associated with that operating system in the manufacturer settings.
- If a discovered device has both the hardware and operating system fields set, classifies the device based on values of the discovery mapping configuration options. Providers with a lower priority value are tried first. Providers with the same priority value are attempted in an indeterminate order.
To change the discovery mapping configuration options, choose ADVANCED > Discovery Mapping. Enter numerical values for each provider to set the priority. Valid values are 0 or any negative, positive, or decimal numeric value. An empty field defaults to 0.

Discovery Mapping ZenPack overview
Note
This video was recorded using Virtana Resource Manager (a precursor to Collection Zone) but the same principles apply.
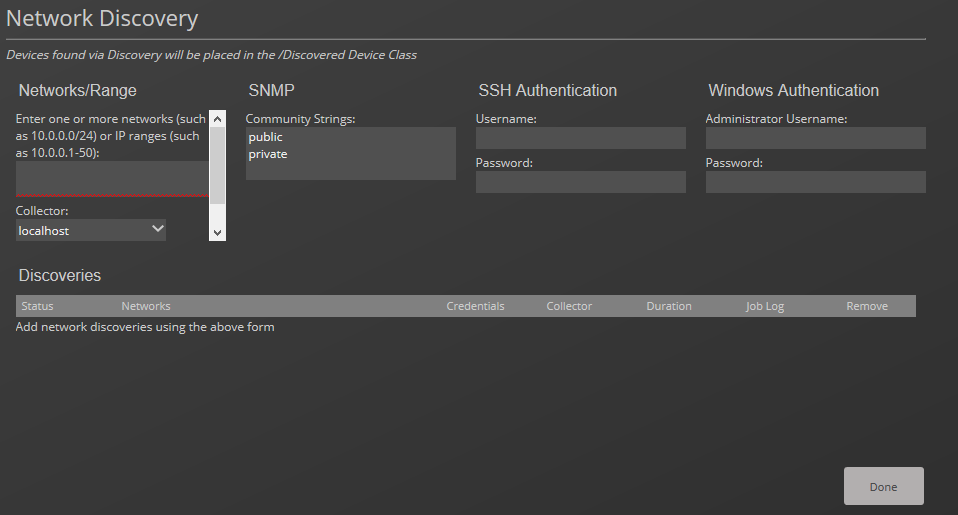
Providing network or IP address range for device discovery
Provide network or IP address range information so that Collection Zone can discover your devices.
- From the navigation menu, select INFRASTRUCTURE > Devices.
-
Click the Add Devices icon and, from the drop-down list, choose Discover Networks.
-
For each network or IP range in which you want the system to discover devices, enter an address or range. For example, enter a network address in CIDR notation 192.0.2.0/24 or a range of IP addresses 192.0.2.1-50. Note: Trying to add a /16 or /8 network can take a very long time, and might have unintended consequences.
- For each network or IP range, specify the Windows, SSH, or SNMP credentials that you want Collection Zone to use on the devices that it discovers, and then click Discover. You can enter only one of each. Collection Zone attempts to use the same credentials on each device that it discovers in the specified networks or IP ranges. Collection Zone uses Advanced Encryption Standard (AES) with a 256-bit key size to encrypt all passwords, and stores them in the Zope object database.
Classifying discovered devices
When discovery is complete, by default, devices are assigned to an appropriate device class in the hierarchy. If necessary, you can change the device class of discovered devices.
If the configuration property zDiscoveryMappingOn is not enabled for the /Discovered device class, devices are not moved from the /Discovered class. You can manually change the device class of discovered devices.
Servers are organized by operating system. For example, if the system discovers Windows devices, you can relocate them to /Server/Windows. If you want to monitor and model using SNMP, classify discovered Linux devices in /Server/Linux. If you want to monitor and model using SSH, classify discovered Linux devices in /Server/SSH/Linux.
- From the device list, choose one or more discovered devices (highlight one or more rows).
- Drag the selected devices to the new device class in the tree view.
- In the Move Devices dialog box, click OK.
The list of devices refreshes, and the devices appear in the newly selected class.
Updating device authentication details
For each device that is added to the database and set to its proper device class, Collection Zone might require additional or different authentication information before it can gather device information and monitor the device.
For example, before the system can monitor a device in the /Server/Windows class, you must supply your Windows user name and password.
Similarly, for a device in the /Server/SSH/Linux class, you must supply your SSH user name and password. Set these values in for the device with the zCommandUsername and zCommandPassword configuration properties.
Note
Collection Zone uses Advanced Encryption Standard (AES) with a 256-bit key size to encrypt all passwords, and stores them in the Zope object database.
- In the devices list, click a device name. The device summary page appears.
- In the left panel, choose Configuration Properties.
- Double-click the zWinRMUser configuration property. The Edit ConfigProperty dialog box appears.
- In the Value field, enter your Windows user name, and then click Submit.
- Double-click the zWinRMPassword configuration property. Enter your Windows password, and then click Submit.
- After making changes, to ensure that the authentication changes are valid, remodel the device.