Inventory
On the Inventory page, you can browse, query, and investigate entities that are currently in your Virtana Service Observability environment.
Because you may have a very large number of entities in your system, the ability to both query and filter your inventory is important to locate and examine specific entities that are critical to your workflows.
Inventory queries consist of one or more entity property-value comparisons. You can view query results in a table with one row per entity and one column for each property. When you create a query that provides rich results, you can save those queries and share them with your team.
Entity properties vary widely by source, so the default table can include many columns. You can narrow down these results using the query bar.
For more information about entities, see Entities and devices.
Note
If you created organizers for your devices in Collection Zone (CZ), you can view them in Inventory. The Organizers view in Inventory provides a Cloud-based alternative to the Infrastructure page in Collection Zone (CZ), to help you transition your workflows more seamlessly to Virtana Service Observability. To learn more, see Organizers tab.
Opening the Inventory page
You can query and examine your inventory of entities from the following locations:
- The Virtana Service Observability header is visible on all tabs. In the header, click INVENTORY.
Note
Your account must be assigned the Read Only User role or a more privileged role to see the INVENTORY tab, run or create queries, and display entity tables.
Tour of the Inventory page
When you click the INVENTORY tab, you see the Inventory page title with a menu icon, the query bar, and several sections, such as Explore Properties and Templates. Each section includes property names or query cards that you can click to get started with your search. To hide or open a section, click its title.
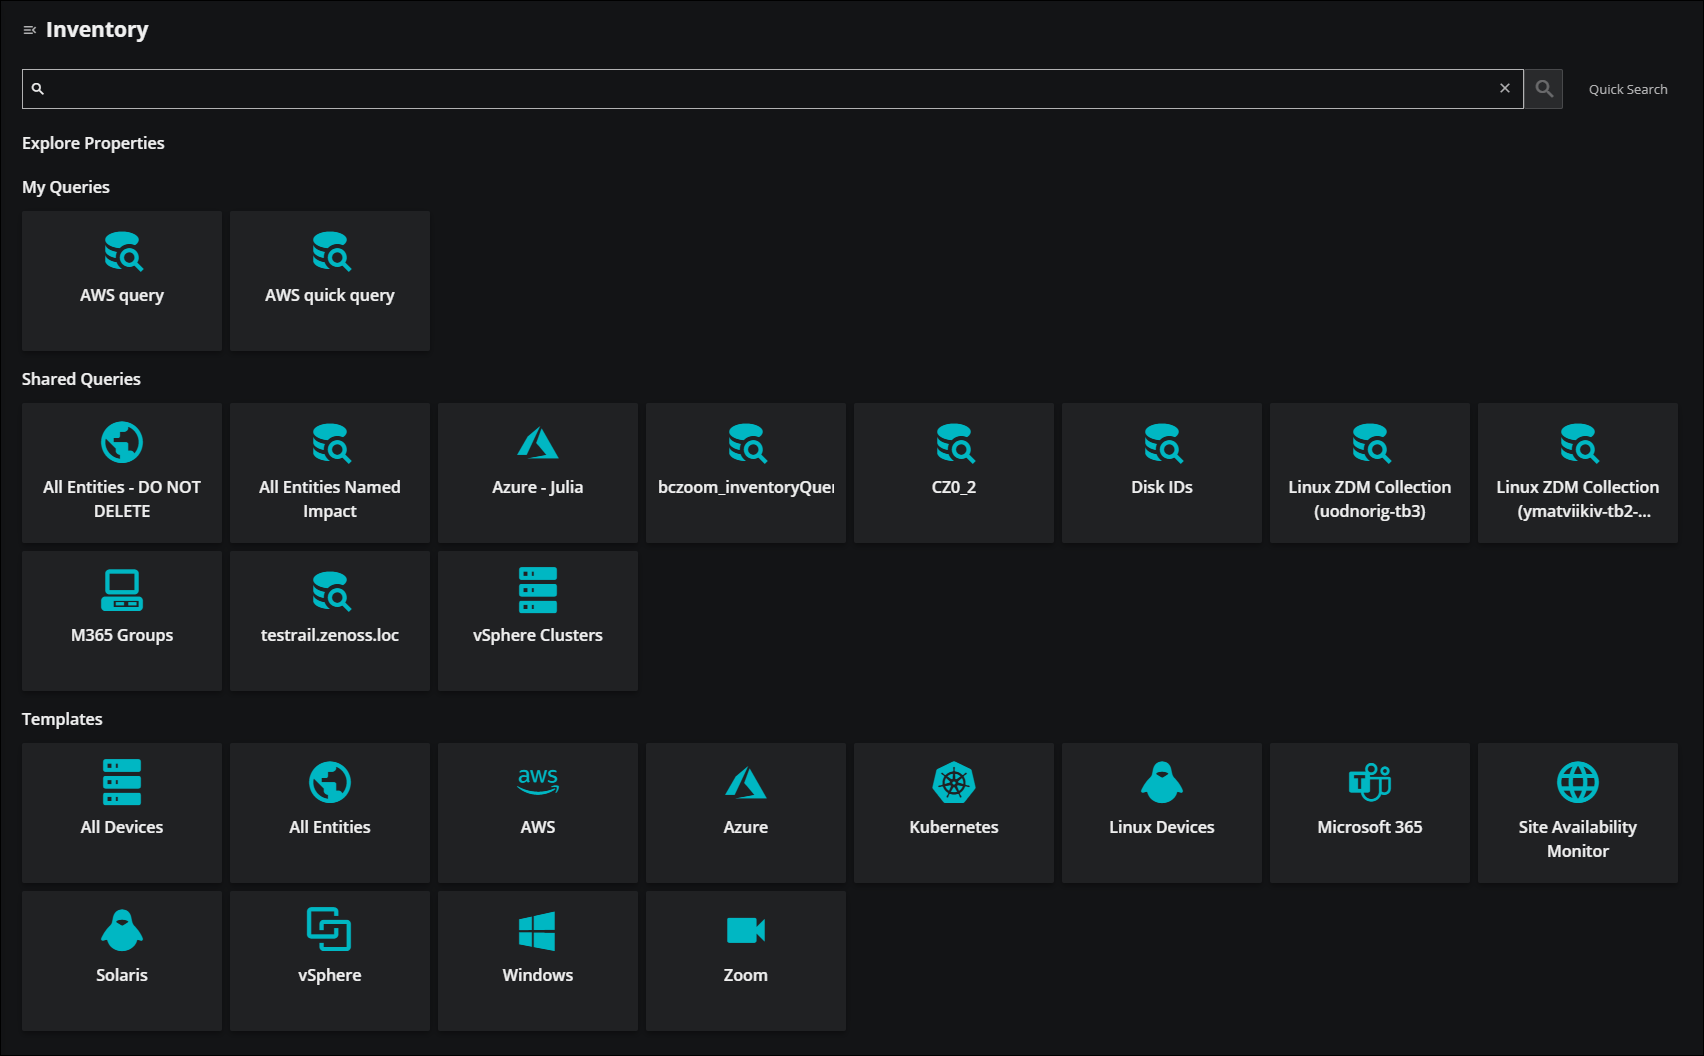
Let's take a closer look at the main sections you might see on the initial page:
Explore Properties
-
Click the section title to view a list of entity property names in your environment. By default, the list is hidden.
Once open, you can use the search field below the title to display a subset of properties. Note that the list doesn't include the internal properties that are generated by Virtana Service Observability.
My Queries
-
This section contains queries that you create and save. You can only see this section when you have saved queries.
When you mark a query as public, it's also added to the Shared Queries list. Click any query card to display its results.
Shared Queries
-
This section contains queries that are created and shared by you and others in your organization. You can only see this section when you have shared queries in your environment.
Click any query card to display its results.
Templates
- This section contains the queries that Virtana provides. These templates are useful if you are new to using Inventory. Select a template to get started, customize it when viewing results, then save it as a query to use later or share with other users.
Accessing the Inventory panel
The Inventory panel is your main tool for finding saved queries and templates, or for finding organizers from Collection Zone (CZ) if you are a CZ user.
To open the Inventory panel, click the Inventory menu icon in the upper-left corner of the page, then select either the QUERIES or ORGANIZERS tab.
The panel stays open while you work. When you open the sidebar, it pushes the main table to the right instead of covering it. You can switch between the Queries and Organizers tabs to load new views instantly.
Queries tab
In the QUERIES tab of the panel, you can open your favorites and most recently used queries. Additionally, you can share, edit, copy, and delete your queries.
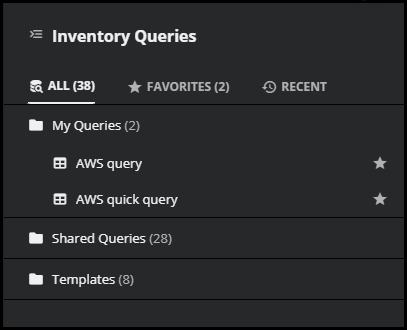
To display a different query, click the name of one of your queries in the My Queries folder, or open the Shared Queries folder and click the name of a shared query. Also, you can click the FAVORITES or RECENT tabs to find a query that you marked as a favorite or opened recently.
Note
The FAVORITES tab isn’t available to read-only users because read-only users can’t mark inventory queries as favorites.
When you hover your pointer over an inventory query, you can click the Actions (⋮) menu to select different options, such as editing, deleting, or sharing the query, or setting it as your default user preference.

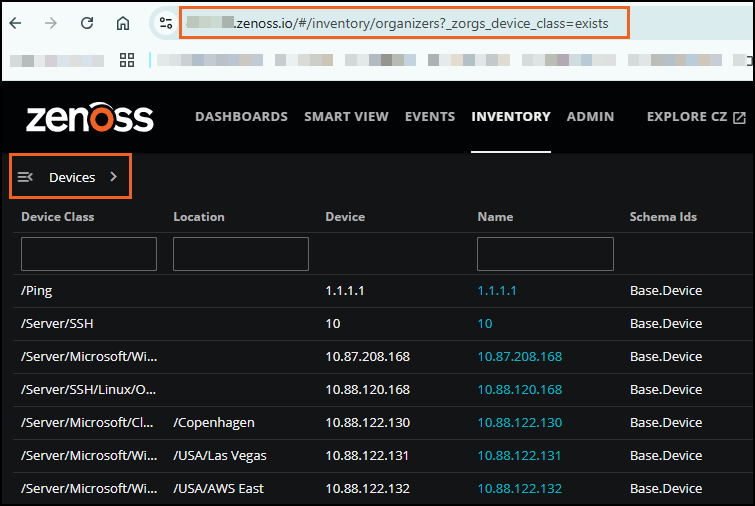
Organizers tab
If you created organizers in Collection Zone (CZ), you can view them in the ORGANIZERS tab of the Inventory panel. When you click the ORGANIZERS tab, the Devices organizer is open by default, matching the results in the table. The table name and the URL also reflect the default query.
If you want to browse through your devices using organizers, click the Inventory panel again to open the tree-like structure of organizers. Expand each organizer to view the folders and devices.
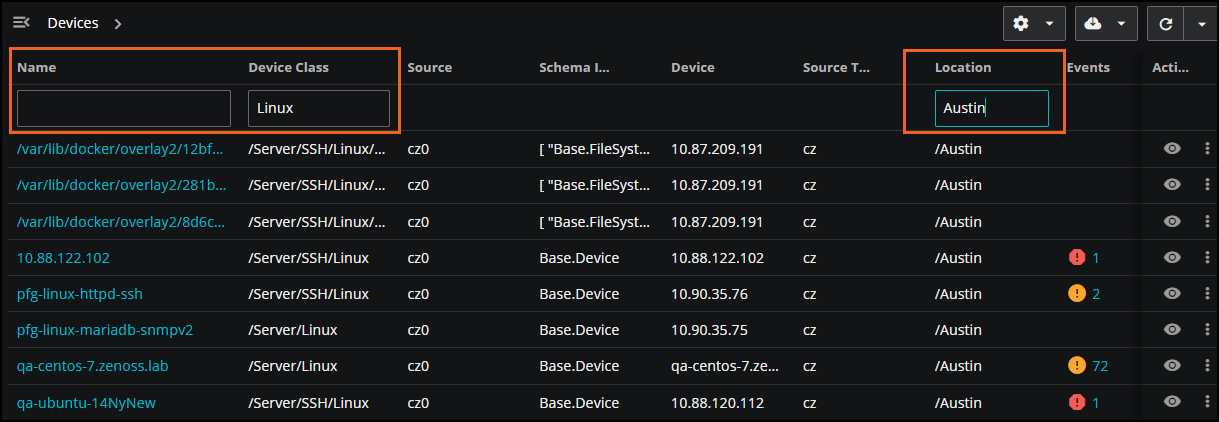
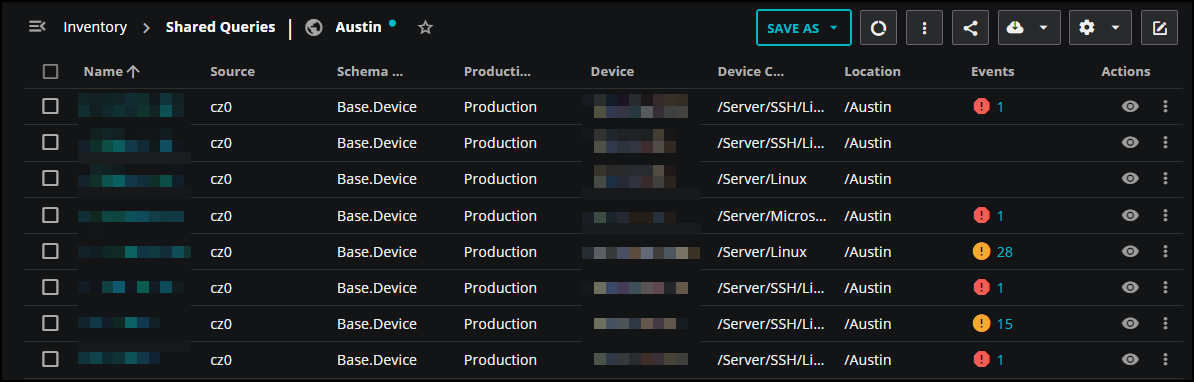
Selecting a specific organizer or device updates the table and the query to reflect your selection. For example, select Locations, then select a specific location, such as Austin. The table and query updates to show only those devices that have a location of Austin.

The table name and the URL also show that the query is now updated to just those results with a location of Austin.
Note
This view is for navigation and investigation only, so you can’t save this view. Instead, use the QUERIES tab.
Organizer types
Organizers are groupings to help you categorize and access monitored devices.
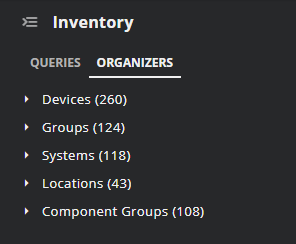
Devices are organized in the tree view by:
-
Devices. A device class is an implicit organizer that defines the base set of properties that characterize a group of devices. A device may belong to only one device class.
-
Groups. Groups let you organize multiple objects by their functions. For instance, you could use groups to sort objects by department.
-
Systems. This organizer is specifically designed to group virtual setups, such as those found in network configurations or systems categorized by their functionality.
-
Locations. Locations help you categorize devices based on where they're physically located. A device can only have one location assigned, which can be broad like a city and state, or really specific like a particular server rack.
-
Component Groups. Component groups allow for flexible organization of device components.
Note
Organizers are set up in Collection Zone (CZ). To learn more, see Organizers.
Using organizers in Inventory
Let’s take a closer look at the organizers in the Inventory panel.
Click the down arrow next to each organizer to expand it and view its included devices.
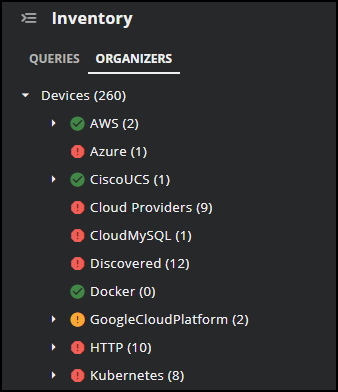
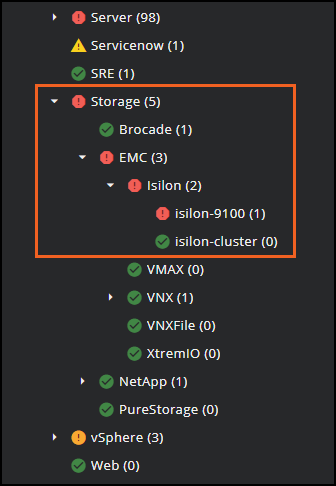
Each category or device class shows a count of devices within that category. For example, in the Devices organizer, the category of Storage appears with a "(5)" in parentheses. This number indicates that it contains five devices with a device class of “Storage” or starting with "Storage/".
The icon next to the category or device class indicates the highest event severity among its contained devices. Only Critical (red), Error (orange), and Warning (yellow) severities are displayed. If a category shows with a green checkmark, then the category either has no devices with events or the category doesn’t contain any devices.
If you want to pinpoint the device or devices with a critical event, you can drill down into the folders. In this case, open Storage > EMC > Isilon. The critical event is associated with "isilon-9100" which you can open in the table to view the details.
If you select multiple devices or just one in your investigation, the table view is the same: one row per device and one column for each property. This table provides a snapshot of the included devices and their key details. To further refine your results, you can apply filters on the Device class, Name, and Location properties. This is useful when you have a large number of devices.
When finished, click the Settings menu to clear filters. Filters are not saved and only apply to your current search, so you can also clear the filters by navigating to a different category in Organizers.
Viewing query results
After you run a query or open a template, you can view a table of entities with one row per entity and one column for each property. This table provides a snapshot of the included entities and their key details, such as location, production state, and associated events.
There are several actions you can take to help you with your investigation:
Working with the summary view
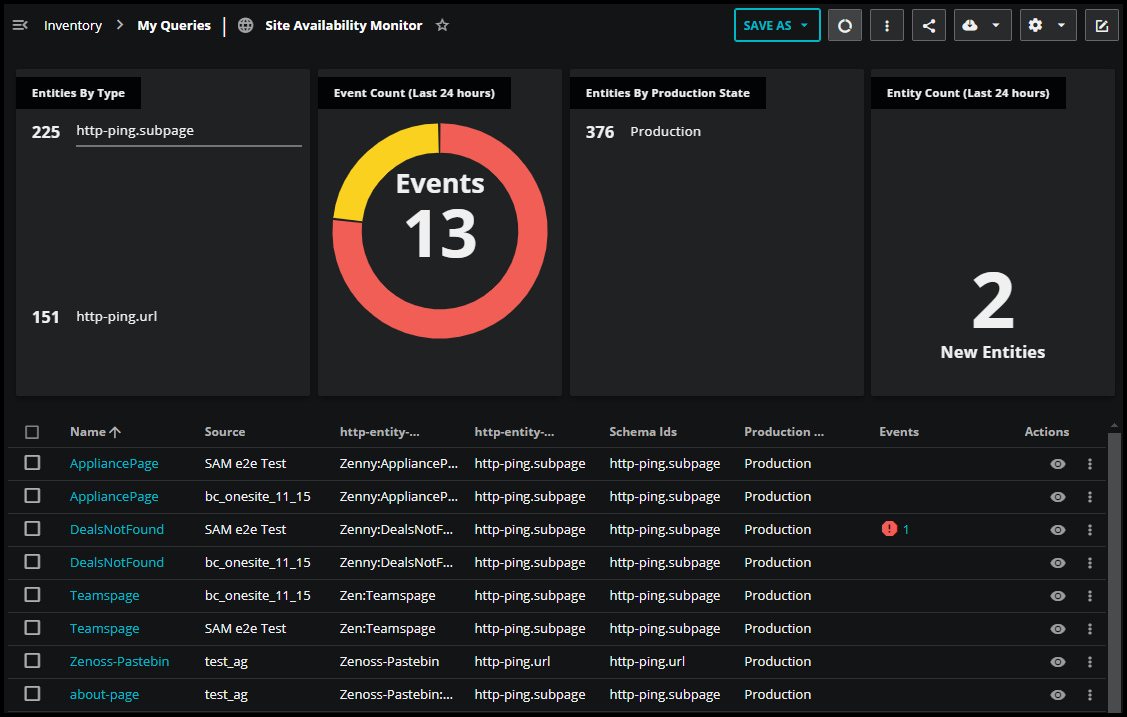
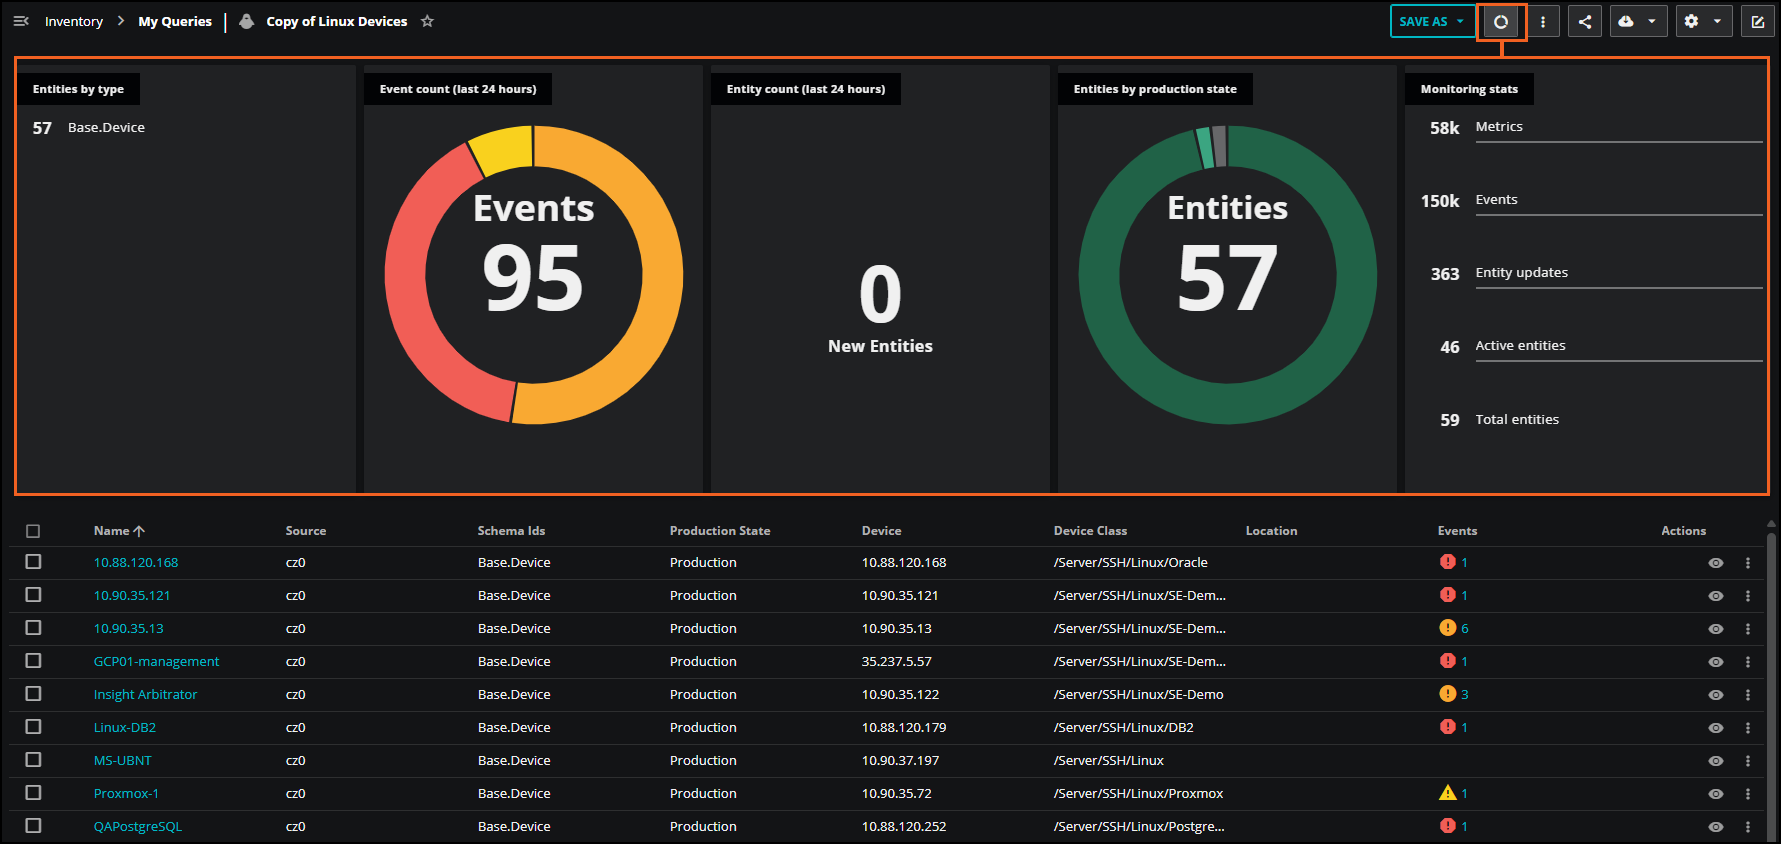
To view a visual summary of the entities included in the selected query, click Summary view. This is useful when you want a quick snapshot of key information about the entities in the selected inventory query. To close, click Summary view again.
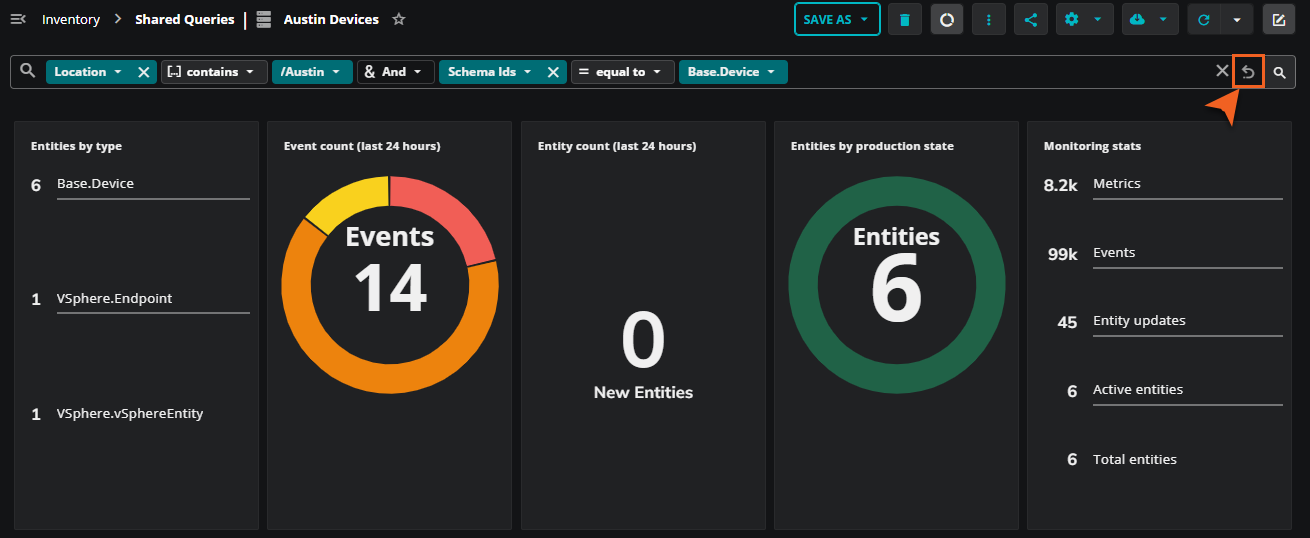
You can use filters to narrow down the list of entities you see in the table. Hover and click on values in any interactive summary tile. If you use summary view tiles to filter your data, you can "undo" your choices one step at a time. This is useful when you want to safely drill down into data without needing to reset the entire search if you make a mistake.
Here's how:
-
When you apply a filter from a summary tile, the Previous filter button appears in the search bar.
-
Click this button to incrementally remove filters, starting with the most recent filter.
-
You can keep clicking the button until you return to your original search.
Summary tiles
The tiles in the summary view highlight useful information from the past 24 hours about the selected query results, including a breakdown of events and production states for your entities.
Tiles include:
-
Entities by type: The number of entities by type in the query results.
-
Event count: The Events donut chart lists the total number of events in the query with a breakdown by event type, including Critical, Error, and Warning. Hover your mouse over the donut chart to see the number of events by type.
-
Entity count: The number of new entities that are included in the query.
-
Entities by production state: The Entities donut chart lists the total number of entities in the query with a breakdown by assigned production state. Hover your mouse over the donut chart to see the number of entities in each state.
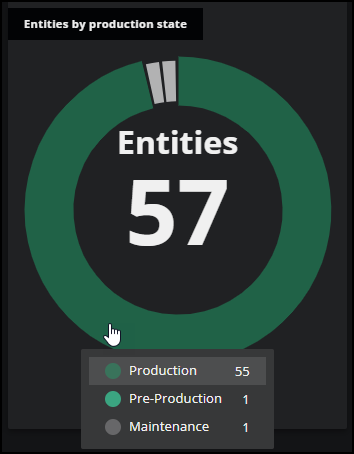
The chart displays only the production states included in the query. Each state is represented by a specific color, such as green for Production and gray for Maintenance, and a random color for custom production states.
-
Monitoring stats: This tile provides an overview of entity monitoring statistics for immediate insight into monitoring activity. The list captures high-level metrics based on your current query, including:
-
Metrics: Estimated total number of metrics collected.
-
Events: Estimated total number of raw events, which includes all instances of an event occurrence. As a result, this number may be higher when compared to data in the Events console.
-
Entity updates: Number of entity property updates, such as updated metadata for models in your CZ.
-
Active entities: Total number of active entities in the selected query. Active entities are ones which meet the query criteria and the time range, and are currently receiving data, such as events, metrics, and model updates.
-
Total entities: Total number of entities in the selected query for the time range. Note that Virtana may not be collecting or receiving data for some of these entities.
-
View entity details
To view additional information about an entity in the table, click the eye icon in the Actions column for the row. In the ENTITY DETAILS dialog box that opens, you can view more details and navigate to Smart View pages.
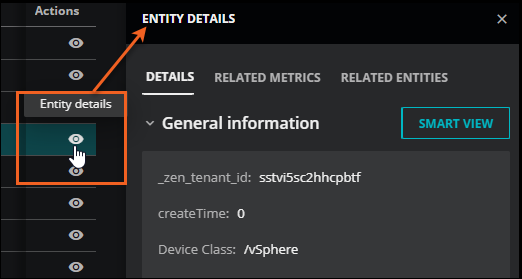
On the DETAILS tab, you can view core properties, metadata information about the entity, and custom properties (if any are associated with the entity). Click the SMART VIEW button to navigate to Smart View to examine the graphs and charts of an entity’s metrics and events. You can also click the following tabs:
-
RELATED METRICS: Quickly view a snapshot of the current metrics for your entity.
-
RELATED ENTITIES: View metrics for related entities.
-
RELATED EVENTS: View related events.

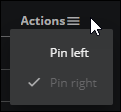
Optionally, you can choose to pin the Actions column on the left side of the table. To do so, click the More actions button next to the column name, then click Pin left.
View device details
If you created organizers in CZ, you can view devices in Inventory using the Organizers tab.
To view additional information about a selected device in the table, click the eye icon in the Actions column for the row. In the ENTITY DETAILS dialog box that opens, you can view more details and navigate to Smart View pages.
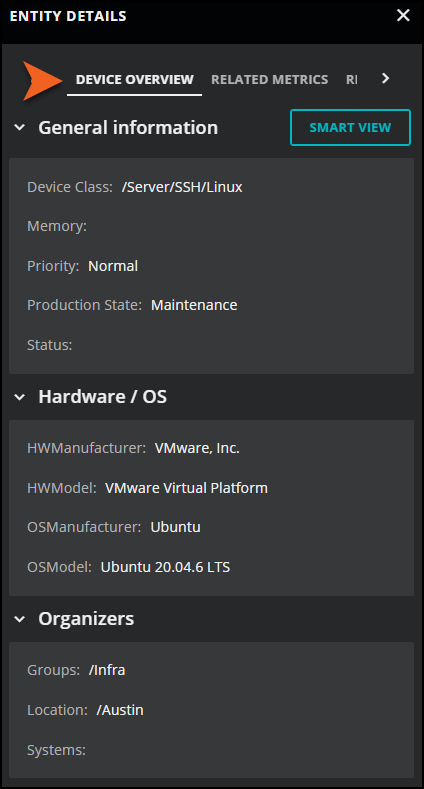
On the DEVICE OVERVIEW tab, you can view the following types of information:
-
General information: Device class, memory, priority, production state, and status
-
Hardware / OS: Hardware and OS component information
-
Organizers: List of organizers that contain the device
Hide or reorder columns
You can change how the properties appear in the table. To make changes, click Adjust columns from the Settings menu.
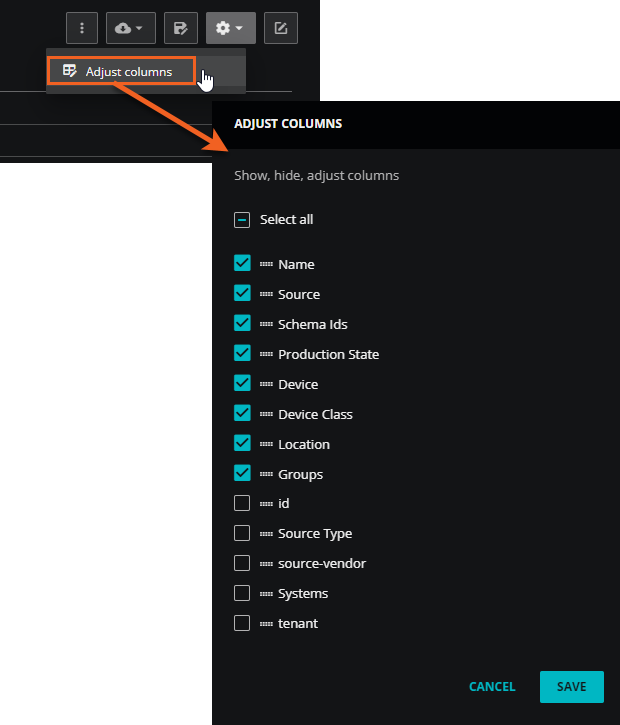
In the ADJUST COLUMNS dialog box that opens, you can select or clear the available columns, and change the order of the columns in the table.
Adjust column views
In the column menu, view the sorting options for that column, including Group by <column name>. This option is useful if you want to focus on a specific group of entities, such as a set of entities in a specific device class or a location of entities. You can choose to group entities in several key columns, including Device, Device Class, Groups, Location, Name, Schema IDs, Source, Source Type, and Systems.
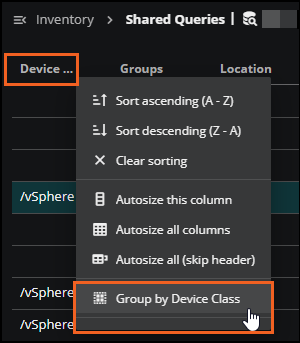
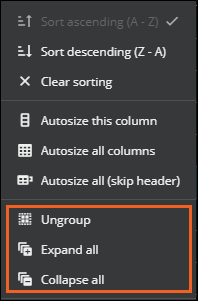
After you click Group by <column name>, expand the row to view the entities in that group. The number of entities within a group is indicated in parentheses. Open the column menu and choose to expand all the rows or collapse all the rows in the groups.
Filter table columns
If you created organizers in CZ, you can view devices in Inventory using the Organizers tab.
To refine your search for devices, apply filters on the Name, Device class, and Location columns. This is useful if you have a large number of devices.
Filters are temporary, only applying to your current search. You can clear them by navigating to another category in Organizers or by clicking the Settings menu.
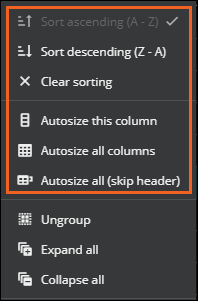
Sort rows
If you have a lot of entities to view, you can use the additional sorting options in this menu:
-
Sort the rows in ascending or descending alphabetical order, or clear any previously applied sort options.
-
Autosize the specified column or all the columns in the table, or choose to autosize all the column contents, but not the header.
Edit column headers
If you want to change an entity field to a friendlier name, you can edit the entity field in the Dictionary. For example, you might want to change “Source” to “My Source.” For more information, see the Entity Fields page in the Dictionary.
Table actions menu
Use the table action buttons to quickly perform a variety of tasks, including saving, sharing, and exporting your results. The actions you see depend on your query or template. These action icons are located in the upper-right corner above the results table.

View the following table to learn more about table actions.
| Icon | Action |
|---|---|
| SAVE AS | Click to save the current query, save the current query as a new query, or discard your changes. When saving as a new query, you can update the title and description of the new query, and select a different icon for it. |
| Summary view | Click to open the summary view of your query's results. |
| Actions options | Click to add a maintenance window, update a production state, or update priority. |
| Share | Make the inventory view public if you are the owner, or copy its URL to your clipboard. |
| Settings | From Settings, click Adjust columns to open the ADJUST COLUMNS dialog box. Here, you can select or hide columns in the results table, or change the order of the columns in the table. Limiting the columns to just what you need can help avoid confusion. |
| Export table | You can export data from your Inventory views to share with others or to use in other tools. You can perform a one-time manual export or set up an automated export schedule. See Export query results. |
| Refresh | Click to refresh the query results. |
| Expand/Collapse query bar | Display or hide the query bar. |
Search your inventory
In the Inventory view, you can browse, search, and filter your inventory of devices, property names, and more.
Create a tailored search from scratch, a template, or a saved query using the query builder. As you enter text, the search bar suggests options for each part of the query, including property names, operators, values, and connectors. If needed, use the autocomplete dropdowns to change a part of the query.
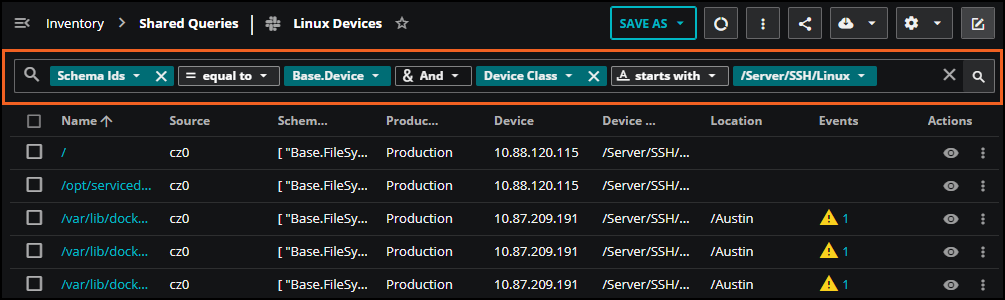
For example, you might have saved a query to browse your Linux devices, but maybe you want to focus only on those devices that are in maintenance. You can add on to your existing query by adding a connector, property, operator, and value. In this example, you might enter “Production State” with the operator “equal to” and the value “Maintenance” to filter your results to just those Linux devices in maintenance.

Let's take a closer look at the query parts:

| Number | Query part |
|---|---|
| 1 | Property name that you are asking for in the query, such as “Schema IDs” or “Device Class”. To view or add user-friendly alternatives to computer-generated entity field names, see the Entity Fields page in the Dictionary. |
| 2 | Operators that control whether or not an entity meets the criteria defined in the query. Operators for string types include the following: 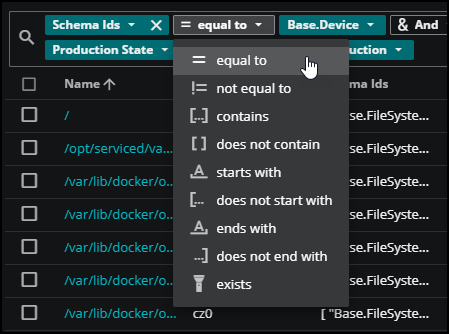 - equal to: Returns results where the property equals the defined value. - not equal to: Returns results where the property doesn’t equal the defined value. - contains: Returns results where the property contains the string in the defined value. - does not contain: Returns results where the property doesn’t contain the string in the defined value. - starts with: Returns results where the property starts with the defined value. - does not start with: Returns results where the property doesn’t start with the defined value. - ends with: Returns results where the property ends with the defined value. - does not ends with: Returns results where the property doesn’t end with the defined value. - exists: Tests whether an entity has a property and, if so, whether the property's value is non-null. Operators for numeric types include the following: 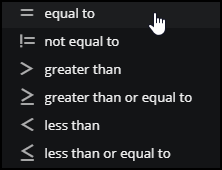 - equal to: Returns results where the property is equal to the defined value. - not equal to: Returns results where the property is not equal to the defined value. - greater than: Returns results where the property is greater than the defined value. - greater than or equal to: Returns results where the property is greater than or equal to the defined value. - less than: Returns results where the property is less than the defined value. - less than or equal to: Returns results where the property is less than or equal to the defined value. |
| 3 | Value that is controlled by the operator. For example, you might build a query to find schema IDs that are equal to the value “Base.Device” in your inventory. “Base.Device” is the value controlled by the operator. |
| 4 | Connector for conditions, such as AND and OR. The AND connector has precedence. |
If your query contains multiple lines, use the scroll control in the query bar.
Create a query
You can search your inventory by creating queries composed of one or more entity property-value comparisons. As you build and refine your query, the results update automatically.
Note
This query bar supports keyboard accessibility. For example, press the keyboard arrow keys to move through menus, press Enter or Tab to select options, and press Backspace or Delete to remove options.
-
From a template or saved query, click Expand query bar to open the query builder, then create a query to narrow the entities to just those that you want to view in your inventory.

-
Select a property. Enter text and select a field in the dropdown menu.
-
Select an operator in the dropdown menu.
-
Enter a value.
-
Optionally, build a more targeted query. Choose between AND and OR to join another property-value comparison.
-
Click the search button (magnifying glass icon) to search for results that match your criteria.
Save a query
After you are satisfied with the results of your query, you can save it for future use. Click Save or Save as and name it for easy identification.

Share a query
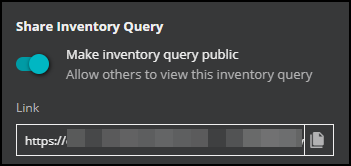
After you create a query or open a saved query, you can share it. Click the Share button and turn on the Make inventory query public option. You can copy the link to share with other users.
Export query results
You can export data from your Inventory views to share with others or to use in other tools. You can perform a one-time manual export or set up an automated export schedule.
Note
Virtana Service Observability can export up to 100,000 rows of data at a time.
Manually export query results
To download a table to your local machine immediately, click the Export Table button.
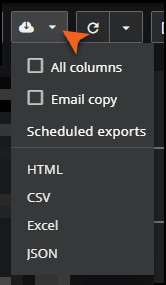
When you manually export a table, you can choose the following options:
-
All columns: Select this checkbox to download every available column for the device type. Clear this checkbox to export only the columns currently visible in your table. Keep in mind that selecting all columns increases the size of your file.
-
Email a copy: Select this checkbox to send the file to your email address. This is helpful for large datasets because it allows you to continue working in Virtana while the system processes the file.
When you select this option, look for an email from noreply@virtana.ai with the subject line, "Export: Inventory". Click the link in the email to download your file.
-
Format: Select your preferred file type, such as CSV or JSON.
Scheduling exports
The Export Scheduler allows you to automate your reporting. Instead of manually downloading files, you can schedule Virtana to send inventory data directly to your email at regular times.
Requirements for scheduling
To schedule exports, ensure that you have write permission, you're working with a saved view, and you have set the proper level of visibility.
-
Permissions: You must have at least write permissions to use scheduling. For more information, see Roles and Permissions.
-
Saved views: You can only schedule exports for saved views. You cannot schedule exports for default system templates.
-
Visibility: Your export's visibility depends on the view. If a view is private, only you receive the export. If a view is public, you can send the export to multiple team members.
Create a schedule
To set up an automated report, perform the following steps.
-
Navigate to Inventory and select a saved view.
-
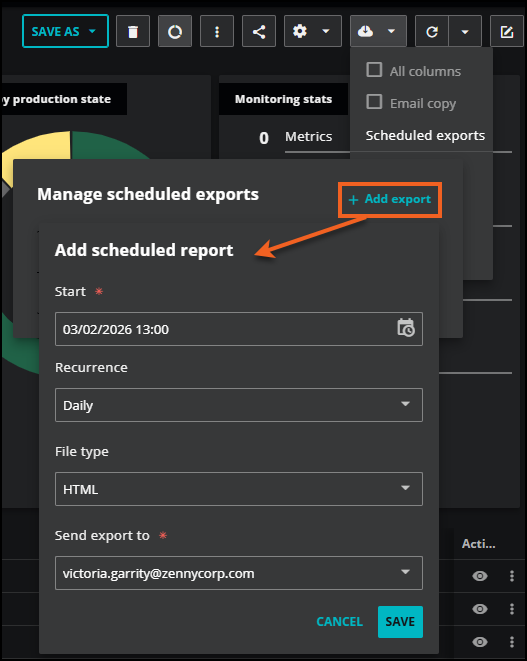
Click the Export Table icon and select Scheduled exports. The Manage schedule exports panel opens.
-
Click + Add export.
-
Fill in the following fields:
Field Description Start Select the date and time for the first export. Recurrence Choose how often the report should repeat, for example, everyday or every week. Options include Daily, Weekly, and Monthly. File type Select your preferred format. Options include HTML, CSV, Excel, and JSON. Emails For public views, enter the email addresses of the people who should receive the report. When a scheduled export arrives in your inbox, the email includes the attached data file, the name of the inventory view, and a direct link that takes you back to that specific view in Virtana for further analysis. Be sure that you are logged in to Virtana SO to view the query. -
Click Save.
Managing your schedules
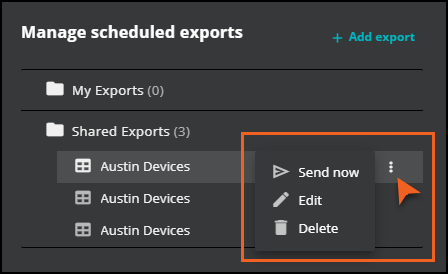
You can send, edit, or delete your existing schedules by clicking the More options (three dots) icon next to any export in the menu.
-
Send now: Sends the export immediately.
-
Edit: Change the schedule, file type, or view the filters used for the export.
-
Delete: Permanently stop the scheduled export.
Update production state
You can add or edit the production state for one or more entities in Inventory. For example, you can update a production state of "Maintenance" to "Production" using the Update production state action. In the list of available production states, the check mark indicates the currently assigned state for the entity.
To learn more about production states and how you can use them in Virtana, see About production states.
Note
Updating production states for entities in Inventory doesn’t impact the assigned production state for those entities in Collection Zones (CZ). For more information about production states in CZ, see Production states in CZ.
To update the production state of one or more entities, perform the following steps:
-
If you have not already done so, navigate to Inventory and open or create a query.
-
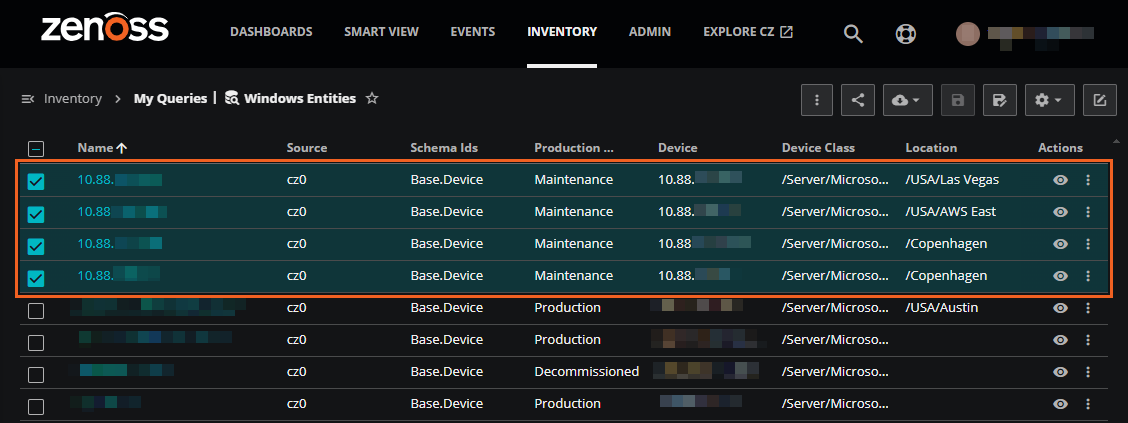
Search your Inventory to locate the entity or entities that you want to update.
-
In your search results, select the checkbox next to each entity that you want to update.
-
In the toolbar, click the More actions button, then select Update production state.
Alternatively, locate the row with the entity you want to update, then click the More actions icon in the row. Select Update production state.
-
In the menu that appears, choose a production state for the selected entity or entities.
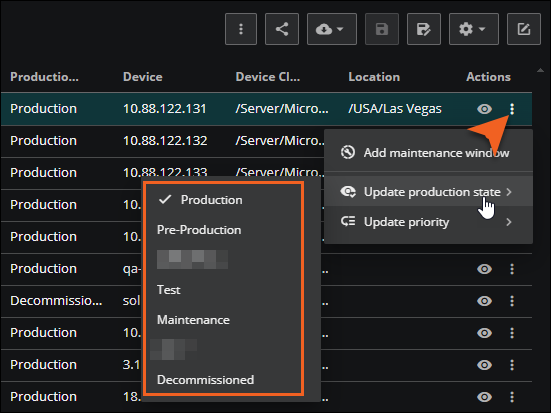
The entity updates with the selected production state. You can open the Details panel from the entity row to view the currently selected production state.
Priority
The priority of an entity indicates the degree of importance of that entity to your organization. Priority provides a relative measure of importance, such as "Low" or "High", to help you narrow down a large set of entities.
For example, you might want to focus your work on just those entities that you’ve marked as "highest" in importance. The Priority field helps with this task by providing you with a set of relative measures.
Priority levels in Virtana include the following list, but you can add custom levels to meet your specific needs. "Normal" is the default priority level.
- Highest
- High
- Normal (default)
- Low
- Lowest
- Trivial
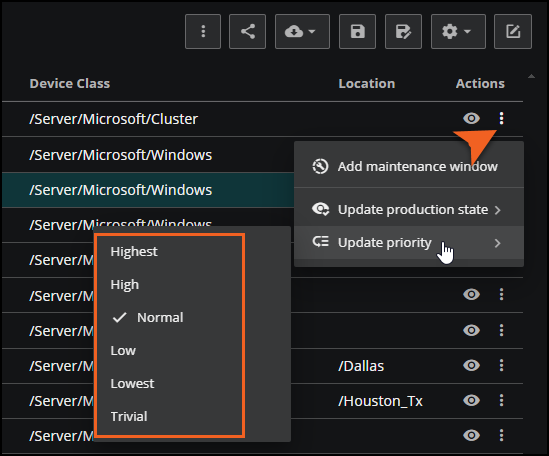
Update priority
You can add or edit the priority level for an entity in Inventory. For example, you can update a priority of "Normal" to "High" directly in Inventory using the Update priority option. In the list of available priority levels, the check mark indicates the currently assigned priority for the entity.
Note
Updating priority levels for entities in Inventory doesn’t impact the assigned CZ Priority for those entities in Collection Zones (CZ).
To update the priority of one or more entities, perform the following steps:
-
If you have not already done so, navigate to Inventory and open or create a query.
-
Search your Inventory to locate the entity or entities that you want to update.
-
In your search results, select the checkbox next to each entity that you want to update.
-
In the toolbar, click the More actions button, then select Update priority.
Alternatively, locate the row with the entity you want to update, then click the More actions icon in the row. Select Update priority.
-
In the menu that appears, choose a priority for the selected entity or entities. The checkmark indicates the currently selected priority.
The entity updates with the selected priority level. You can open the Details panel from the entity row to view the currently selected priority.
Maintenance windows
You can schedule a maintenance window for a specific entity or a collection of entities. You might want to set up a maintenance window, for example, to perform configuration changes or reboot an entity.
Maintenance windows help you define a schedule for when to perform potentially disruptive actions on your entities, such as patching an operating system or installing software updates. Each maintenance window has a name, a schedule, a duration, and a set of targeted entities. You can also add tags to help you identify and sort your windows and entities.
When you create a maintenance window, you can define the notifications you receive during the duration. For example, you might want to notify your team when a maintenance window starts and then again when it ends. Use the Actions page when scheduling your maintenance window to set up these notifications.
Add a maintenance window
To add a maintenance window in Inventory, perform the following steps:
-
If you have not already done so, navigate to Inventory and open or create a query.
-
Search your Inventory to locate the entity or entities that you want to update. This query defines the criteria for the maintenance window.
-
Optionally, you can further define the number of entities to include in the maintenance window. In your search results, select the checkbox next to each entity that you want to include for maintenance.
-
In the toolbar, click the More actions button, then select Add maintenance window.
Alternatively, locate the row with the entity you want to update, then click the More actions icon in the row. Select Add maintenance window.
-
In the ADD MAINTENANCE WINDOW dialog box, schedule your maintenance window and optionally create notifications for it. For more information about these steps, see Scheduling maintenance windows.
Learn more
Click the links below to learn more about managing maintenance windows and notifications:
-
To learn more about maintenance windows and managing them for your organization, see Maintenance Windows.
-
For more information about setting up maintenance window notifications, see Setting up maintenance window rules and triggers.
-
To get started scheduling maintenance windows, see Scheduling maintenance windows.