Kubernetes connector
Virtana Service Observability provides a ready-made connector for your Kubernetes platform. After you set up the Kubernetes connector, you can monitor metrics for your Kubernetes platform.
Kubernetes model data
Virtana Service Observability uses the data collected by the Kubernetes connector to create separate entities for each unique node, pod, container, and namespace in a cluster, and one entity for the cluster itself. To find a cluster in a dashboard scope query or Smart View query, enter the cluster name that you specified when you set up the connector.
Modeled entities include:
- k8s.cluster
- k8s.container
- k8s.deployment
- k8s.initcontainer
- k8s.namespace
- k8s.node
- k8s.pod
- k8s.service
- k8s.statefulset
Entity relationships
The model data that the Kubernetes connector sends to Virtana Service Observability includes entity relationships. The following diagram illustrates the relationships:

The arrows show which objects affect other objects. The relationships are used to populate the related entities area in Smart View.
The following list replicates the diagram in text:
- Nodes affect pods and the cluster.
- The cluster affects namespaces.
- Namespaces and containers affect pods.
Kubernetes metric data
You can configure many of the metrics that Virtana Service Observability collects for Kubernetes as tiles in Dashboards. All metrics are the gauge metric type.
Cluster metrics
| Metric | Units | Description |
|---|---|---|
| k8s.cluster.allocatable.cpu.ms | millisecond | Sum of all the allocatable CPU for the nodes in the Kubernetes cluster. |
| k8s.cluster.allocatable.memory.bytes | byte | Sum of all the allocatable memory for the nodes in the Kubernetes cluster. |
| k8s.cluster.capacity.cpu.ms | millisecond | Sum of all the capacity CPU for the nodes in the kubernetes cluster. |
| k8s.cluster.capacity.memory.bytes | byte | Sum of all the capacity memory for the nodes in the kubernetes cluster. |
| k8s.cluster.containers.total | integer | Total number of containers in the Kubernetes cluster. |
| k8s.cluster.cpu.ms | millisecond | Total CPU milliseconds used by all containers in the Kubernetes cluster. |
| k8s.cluster.limits.cpu.ms | millisecond | Sum of all the container CPU limits in the kubernetes cluster. |
| k8s.cluster.limits.memory.bytes | byte | Sum of all the container memory limits in the kubernetes cluster. |
| k8s.cluster.memory.bytes | byte | Total memory bytes used by all containers in the Kubernetes cluster. |
| k8s.cluster.nodes.total | integer | Total number of nodes in the Kubernetes cluster. |
| k8s.cluster.pods.total | integer | Total number of pods in the Kubernetes cluster. |
| k8s.cluster.requests.cpu.ms | millisecond | Sum of all the container CPU requests in the kubernetes cluster. |
| k8s.cluster.requests.memory.bytes | byte | Sum of all the container memory requests in the kubernetes cluster. |
| k8s.cluster.unhandledevents.total.sincestart | integer | Total number of unhandled events. |
Node metrics
| Metric | Units | Description |
|---|---|---|
| k8s.node.allocatable.cpu.ms | millisecond | Allocatable CPU for the kubernetes node. |
| k8s.node.allocatable.memory.bytes | byte | Allocatable memory for the kubernetes node. |
| k8s.node.capacity.cpu.ms | millisecond | CPU Capacity for the kubernetes node. |
| k8s.node.capacity.memory.bytes | byte | Memory Capacity for the kubernetes node. |
| k8s.node.cpu.ms | millisecond | CPU milliseconds used by the Kubernetes node. |
| k8s.node.memory.bytes | byte | Memory bytes used by the Kubernetes node. |
| k8s.node.cpu.ms | millisecond | CPU milliseconds used by the Kubernetes node. |
| k8s.node.memory.bytes | byte | Memory bytes used by the Kubernetes node. |
Namespace metrics
| Metric | Units | Description |
|---|---|---|
| k8s.namespace.containers.total | integer | Total number of containers in the Kubernetes namespace. |
| k8s.namespace.cpu.ms | millisecond | Total CPU milliseconds used by all containers in the Kubernetes namespace. |
| k8s.namespace.memory.bytes | byte | Total memory bytes used by all containers in the Kubernetes namespace. |
| k8s.namespace.pods.total | integer | Total number of pods in the Kubernetes namespace. |
Deployment metrics
| Metric | Units | Description |
|---|---|---|
| k8s.deployment.generation.observed | generation | Most recent generation observed for the Kubernetes deployment. |
| k8s.deployment.generation | generation | Current generation for the Kubernetes deployment. |
| k8s.deployment.replicas.available | integer | Number of available replicated pods for the Kubernetes deployment. |
| k8s.deployment.replicas.desired | integer | Number of desired replicated pods for the Kubernetes deployment. |
| k8s.deployment.replicas.ready | integer | Number of ready replicated pods for the Kubernetes deployment. |
| k8s.deployment.replicas.rollingupdate.max.surge | integer | Maximum number of replicated pods that can be scheduled above the desired number during a rolling update of the Kubernetes deployment. |
| k8s.deployment.replicas.rollingupdate.max.unavailable | integer | Maximum number of unavailable replicated pods during a rolling update of the Kubernetes deployment. |
| k8s.deployment.replicas.unavailable | integer | Number of unavailable replicated pods for the Kubernetes deployment. |
| k8s.deployment.replicas.updated | integer | Number of updated replicated pods for the Kubernetes deployment. |
| k8s.deployment.replicas | integer | Number of replicated pods for the Kubernetes deployment. |
Pod metrics
| Metric | Units | Description |
|---|---|---|
| k8s.pod.containers.total | integer | Total number of containers in the Kubernetes pod. |
| k8s.pod.cpu.ms | millisecond | Total CPU milliseconds used by all containers in the Kubernetes pod. |
| k8s.pod.limits.cpu.ms | millisecond | CPU limit for the Kubernetes pod. |
| k8s.pod.limits.memory.bytes | byte | Memory limit for the Kubernetes pod. |
| k8s.pod.memory.bytes | byte | Total memory bytes used by all containers in the Kubernetes pod. |
| k8s.pod.overhead.cpu.cores | core | Pod overhead with respect to CPU cores associated with running a pod. |
| k8s.pod.overhead.memory.bytes | byte | Pod overhead with respect to memory associated with running a pod. |
| k8s.pod.requests.cpu.ms | millisecond | CPU requested for the Kubernetes pod. |
| k8s.pod.requests.memory.bytes | byte | Memory requested for the Kubernetes pod. |
Statefulset metrics
| Metric | Units | Description |
|---|---|---|
| k8s.statefulset.collisions | integer | Number of hash collisions from the Kubernetes statefulset. |
| k8s.statefulset.generation.observed | generation | Most recent generation observed for the Kubernetes statefulset. |
| k8s.statefulset.generation | generation | Current generation for the Kubernetes statefulset. |
| k8s.statefulset.replicas.available | integer | Number of available replicated pods for the Kubernetes statefulset. |
| k8s.statefulset.replicas.current | integer | Number of replicated pods for the current revision of Kubernetes statefulset. |
| k8s.statefulset.replicas.ready | integer | Number of ready replicated pods for the Kubernetes statefulset. |
| k8s.statefulset.replicas.updated | integer | Number of updated replicated pods for the Kubernetes statefulset. |
| k8s.statefulset.replicas | integer | Number of replicated pods for the Kubernetes statefulset. |
Container metrics
| Metric | Units | Description |
|---|---|---|
| k8s.container.cpu.ms | millisecond | CPU milliseconds used by the Kubernetes container. |
| k8s.container.limits.cpu.ms | millisecond | CPU limit for the Kubernetes container. |
| k8s.container.limits.memory.bytes | byte | Memory limit for the Kubernetes container. |
| k8s.container.memory.bytes | byte | Memory bytes used by the Kubernetes container. |
| k8s.container.requests.cpu.ms | millisecond | CPU requested for the Kubernetes container. |
| k8s.container.requests.memory.bytes | byte | Memory requested for the Kubernetes container. |
| k8s.container.status.restarts.total | integer | Number of restarts for the Kubernetes container. |
Initcontainer metrics
| Metric | Units | Description |
|---|---|---|
| k8s.initcontainer.limits.cpu.ms | millisecond | CPU limit for Kubernetes init container. |
| k8s.initcontainer.limits.memory.bytes | byte | Memory limit for Kubernetes init container. |
| k8s.initcontainer.requests.cpu.ms | millisecond | CPU requested for Kubernetes init container. |
| k8s.initcontainer.requests.memory.bytes | byte | Memory requested for Kubernetes init container. |
| k8s.initcontainer.status.restarts.total | integer | Number of restarts for the Kubernetes init container. |
Setting up a Kubernetes connector
As a best practice before setting up your connector, check that your service allows the source IP address from which to expect connections. See Before setting up your connectors for the list of IP addresses and more information.
Set up a Kubernetes connector
Perform the following steps to set up a Kubernetes connector.
Note
Your account must be assigned the Manager role to create and manage connectors.
-
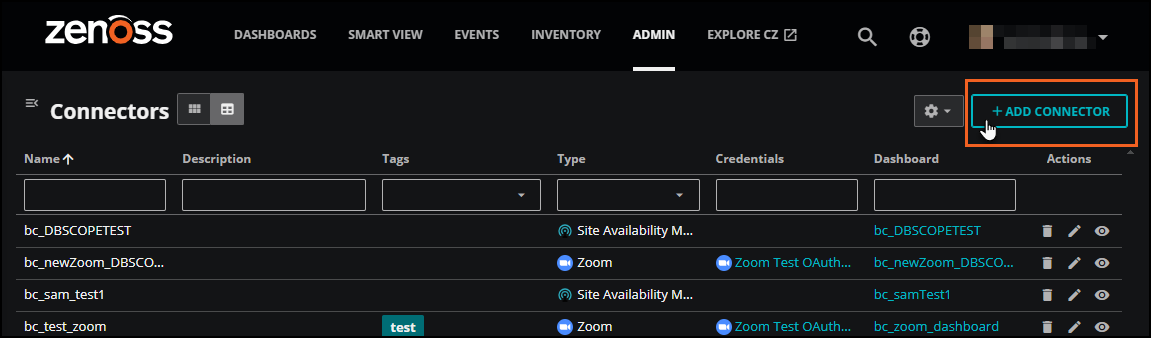
Log in to Virtana Service Observability as a user with the Manager role, and then open the ADMIN > Connectors page. Click ADD CONNECTOR.
-
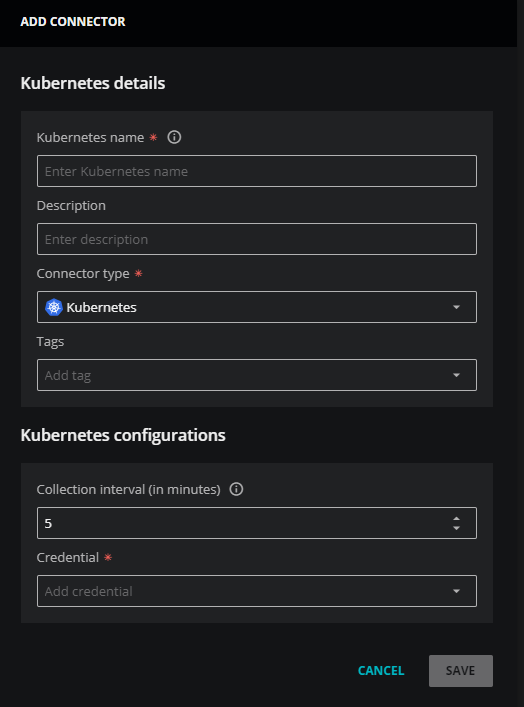
On the SELECT CONNECTOR TYPE dialog box, click the Kubernetes card. The ADD CONNECTOR dialog box opens.
-
In the Connector details area, enter general information about your Kubernetes connector.
-
In the Kubernetes Name field, enter a unique name.
The name you choose is used as the source name for the data Virtana Service Observability collects.
-
(Optional) In the Description field, enter text to associate with your Kubernetes connector.
-
Keep the Connector type as Kubernetes.
-
(Optional) In the Tags field, enter one or more terms to associate with your Kubernetes connector.
-
-
In the Kubernetes configurations section, set an optional collection interval, then select an existing credential or create a new one.
-
Set the Collection interval. The default setting is 5 minutes.
-
From the Credential list, select an existing credential or create a new one. When you choose Create new credential, the dialog box expands to include fields for creating a new credential for Kubernetes.
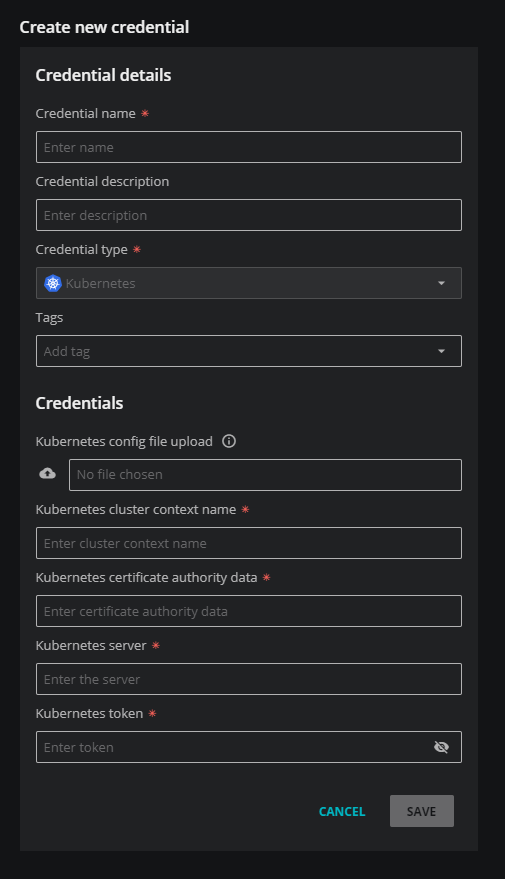
For more information about creating a new credential, see Add Kubernetes credentials.
-
-
(Optional) Click TEST to test your configuration before saving. A success or error message appears.
-
Click SAVE.
To view the metrics that Virtana Service Observability collects, create a dashboard using the Kubernetes template. In Dashboards, copy the Kubernetes dashboard template, then rename it, adjust the scope, and change the source to the name of the cluster that you are connecting to.
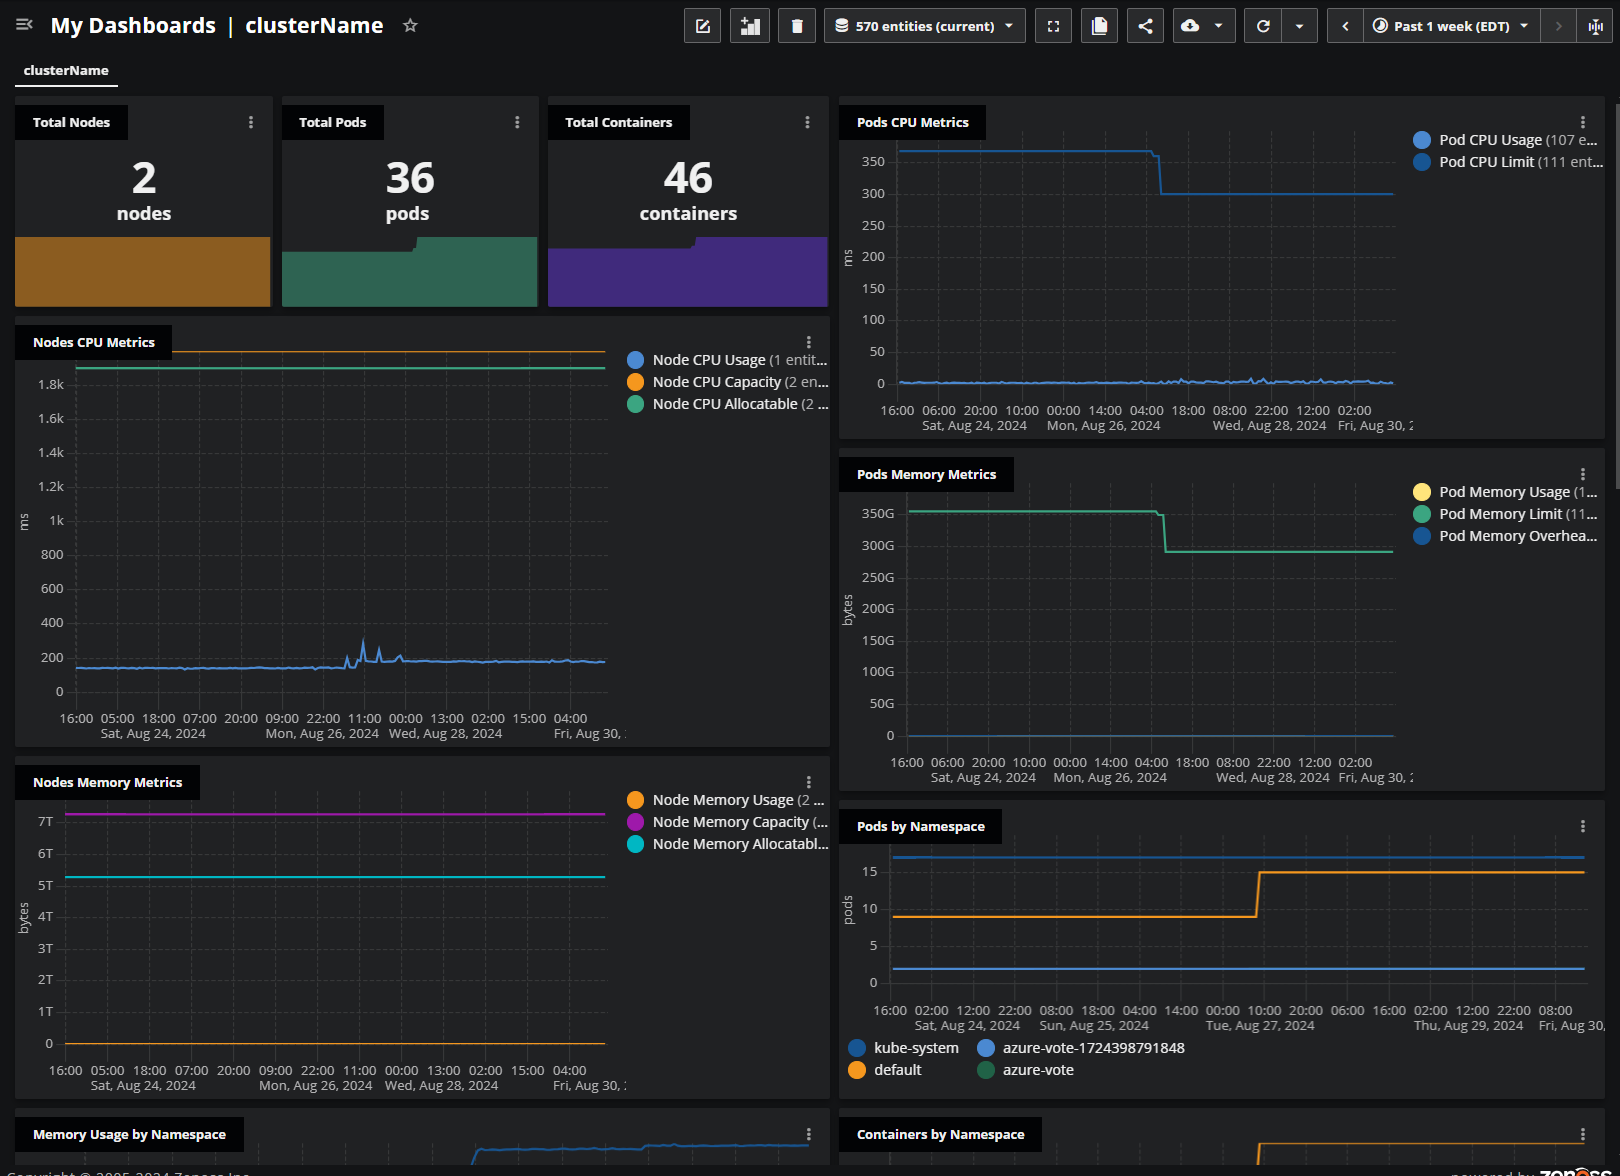
For more information, see copy a template or create a new dashboard.