Installing in Microsoft Azure
Use this procedure to install the collector virtual appliance in your Microsoft Azure environment.
Note
The virtual appliance image for Microsoft Azure is available in Virtana' Shared Image Gallery. To install the image, you need access privileges, which we grant at your request. Simply open a Virtana Support ticket with a list of the email addresses of one or more Azure accounts. After we grant access, Azure sends an invitation to join our gallery to each address you specify. Accept the invitation by clicking the link in the email, and then you are ready to begin installing.
Prerequisites
To perform this task, you need:
- A Microsoft Azure account with permission to create virtual machines.
- Access privileges to Virtana' Shared Image Gallery (see the preceding note).
-
A workstation with the Azure CLI tool installed locally.
Cloud Shell CLI not supported
Attempts to install the collector with the Azure Cloud Shell fail, because cross-tenant shared galleries are not supported in Microsoft's Azure Portal. Specifically, Microsoft Support says:
Azure Portal view is tenant wide based. So you see resources per tenant. It is expected to not see the image versions on the 2nd tenant using Azure Portal. The across tenant feature can be only used via PS or CLI.
Therefore, the Azure CLI must be installed and used locally. The following screen capture shows the error message from an attempt to install the collector appliance with Azure Cloud Shell:

Procedures
Install collector image
Info
This procedure is based on the Azure documentation
at this location
and follows PowerShell
conventions. In particular, variable declarations assume a PowerShell
environment ($VAR="value"). For shells such as Bash, adjust the
declarations as required (VAR="value").
If you engage Virtana Support for assistance, please attach the following to the ticket:
-
A text file that captures any CLI commands and returned output that were executed from the shell in effort to deploy the collector VM.
-
Screen shots that capture anything else related to the issue such as Azure Portal/Web UI errors.
Follow these steps:
-
Open a shell that has Azure CLI installed.
-
Log in to the Azure account in which you wish to deploy the collector appliance.
The following command opens a browser window:
az login -
Display account information and make a note of your tenant's subscription ID.
az account show --output table
az account tenant list --output table
az account subscription list --output table
Ignore
101d518f-e4e8-46e1-addc-7d04935cb8f8(a Virtana ID). -
Switch to the Virtana Azure tenant that hosts the shared image.
If the following command fails, please contact Virtana Support and include the information requested in the Info box at the beginning of this procedure.
az login --tenant "c9f8d3ec-9e03-4fb8-a9cb-fe5bb3cfae72" -
Display account information for troubleshooting use.
az account show --output table az account tenant list --output table az account subscription list --output table -
Set the subscription to your tenant's subscription ID.
The following command targets the destination subscription for deployment steps. Replace
<TENANT-SUBSCRIPTION-ID>with your subscription ID, which you displayed in step 3:az account set --subscription "<TENANT-SUBSCRIPTION-ID>" -
Display account information for troubleshooting use.
az account show --output json az account show --output table az account tenant list --output table az account subscription list --output table -
Create a variable for the Azure location of your collector.
For example,
eastus.$LOCATION="eastus" -
Create a variable for the virtual machine size.
List the sizes available in the location you selected in the previous step. Choose one from the list and set the variable as desired.
For example,
standard_D4as_v4meets the minimum requirements for collectors.az vm list-sizes --location $LOCATION --query [].name | more $SIZE="standard_D4as_v4" -
Create a variable for a resource group in the selected location.
az group list --output json --query "[?location=='$LOCATION'].name" $RESOURCE_GROUP="<name of chosen group from list above>" -
Create a variable for a name for your appliance.
$VMNAME="zenoss-collector-1" -
Create a variable for the location of the image in the Virtana gallery.
Copy the following declaration and paste it in your shell:
$GALLERY_PATH="/subscriptions/101d518f-e4e8-46e1-addc-7d04935cb8f8/resourceGroups/CSE/providers/Microsoft.Compute/galleries/ZenossCollectors/images/Azure/versions/latest" -
Display the variables.
cat <<EOF
LOCATION             = "$LOCATION"
SIZE                 = "$SIZE"
RESOURCE_GROUP       = "$RESOURCE_GROUP"
VMNAME               = "$VMNAME"
GALLERY_PATH         = "$GALLERY_PATH"
EOF
If necessary, make corrections before proceeding.
-
Create the new virtual machine.
The following command includes only required flags, but you may include additional flags as desired for your Azure environment. For example, to skip assigning a public IP address, you would add
--public-ip-address '""'; to configure networking, add the--subnetand--vnet-nameflags; and so on. For more information, please refer to Microsoft documentation.az vm create ` --resource-group "$RESOURCE_GROUP" ` --name "$VMNAME" ` --image "$GALLERY_PATH" ` --enable-agent false ` --size "$SIZE" ` --generate-ssh-keys ` --nic-delete-option=Delete ` --os-disk-delete-option=DeleteTimeout error
Due to a limitation of the Azure CLI tool, the preceding command returns an error message indicating a timeout and that provisioning of the virtual machine has failed. This is a false positive error and should be ignored; the deploy succeeds. Here is an example of the false positive error message:
{"status":"Failed","error":{"code":"DeploymentFailed","message":"At least one resource deployment operation failed. Please list deployment operations for details. Please see https://aka.ms/DeployOperations for usage details.","details":[{"code":"Conflict","message":"{\r\n \"status\": \"Failed\",\r\n \"error\": {\r\n \"code\": \"ResourceDeploymentFailure\",\r\n \"message\": \"The resource operation completed with terminal provisioning state 'Failed'.\",\r\n \"details\": [\r\n {\r\n \"code\": \"OSProvisioningTimedOut\",\r\n \"message\": \"OS Provisioning failure has reached terminal state and is non-recoverable for VM '<vmname>'. Consider deleting and recreating this virtual machine. Also, make sure the image has been properly prepared (generalized).\\r\\n * Instructions for Windows: https://azure.microsoft.com/documentation/articles/virtual-machines-windows-upload-image/ \\r\\n * Instructions for Linux: https://azure.microsoft.com/documentation/articles/virtual-machines-linux-capture-image/. \\r\\n \\r\\nAdditional Details: OS Provisioning for VM '<vmname>' did not finish in the allotted time. The VM may still finish provisioning successfully. Please check provisioning state later. Also, make sure the image has been properly prepared (generalized).\\r\\n * Instructions for Windows: https://azure.microsoft.com/documentation/articles/virtual-machines-windows-upload-image/ \\r\\n * Instructions for Linux: https://azure.microsoft.com/documentation/articles/virtual-machines-linux-capture-image/ \\r\\n * If you are deploying more than 20 Virtual Machines concurrently, consider moving your custom image to shared image gallery. Please refer to https://aka.ms/movetosig for the same.\"\r\n }\r\n ]\r\n }\r\n}"}]} -
Wait 10 minutes, and then verify that your virtual machine exists in the resource group you chose.
az vm show --name $VMNAME --resource-group $RESOURCE_GROUP -
Gain access to the new virtual machine.
Use the SSH key pair generated during installation to log in through the
ccuseraccount:ssh ccuser@public-ip-address -i <path_to_ssh_private_key>
Optional: Set additional DNS search domains or SSH keys
You can customize DNS resolution for your virtual machine and grant access to additional users. The following options are supported:
- Additional DNS forwarding/DNS search domain entries
- A default resolver other than the one provided by Azure
- Additional SSH public keys
Example
For example, you wish to enable the following options for your virtual machine:
- Forward DNS queries for
*.example.comand*.example.orgto the203.0.113.4and203.0.113.5resolvers - Forward DNS queries for
*.myorg.example.netto the198.51.100.253resolver - Forward all other queries to the
192.0.2.2and192.0.2.3resolvers - Grant access to the private SSH keys associated with
public_key1andpublic_key2(through theccuseraccount)
To configure the options, create the following JSON object:
{
    "dns-forwarding": [
        {
            "dns-search": ["example.com", "example.org"],
            "dns-servers": ["203.0.113.4", "203.0.113.5"]
        },
        {
            "dns-search": ["myorg.example.net"],
            "dns-servers": ["198.51.100.253"]
        }
    ],
    "dns-default-servers": ["192.0.2.2", "192.0.2.3"],
    "sshkeys": [ "public_key1", "public_key2"]
}
Then, add the object to your virtual machine configuration in Azure Portal.
Procedure
Follow these steps:
-
Create a JSON object that includes the options you wish to enable.
See the previous section for an example JSON object.
-
In Azure Portal, navigate to your virtual machine, and then click Configuration.
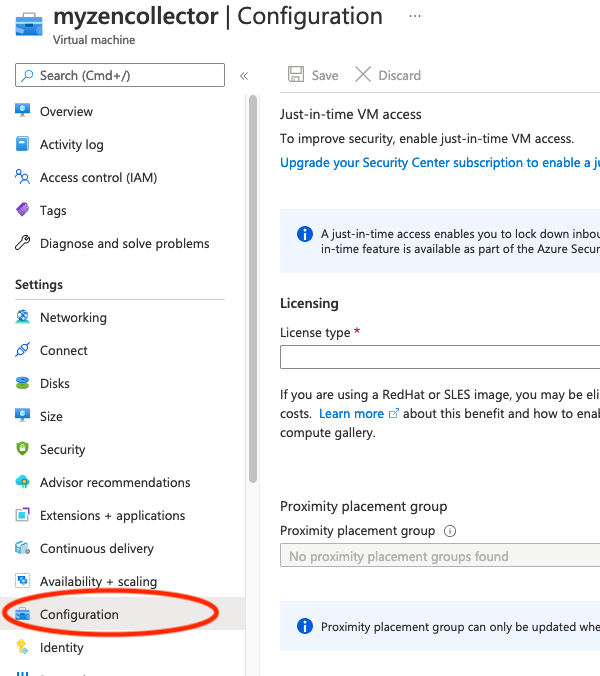
-
In the User data area, configure your virtual machine.
- Check Modify user data.
-
In the User data field, paste your JSON object.
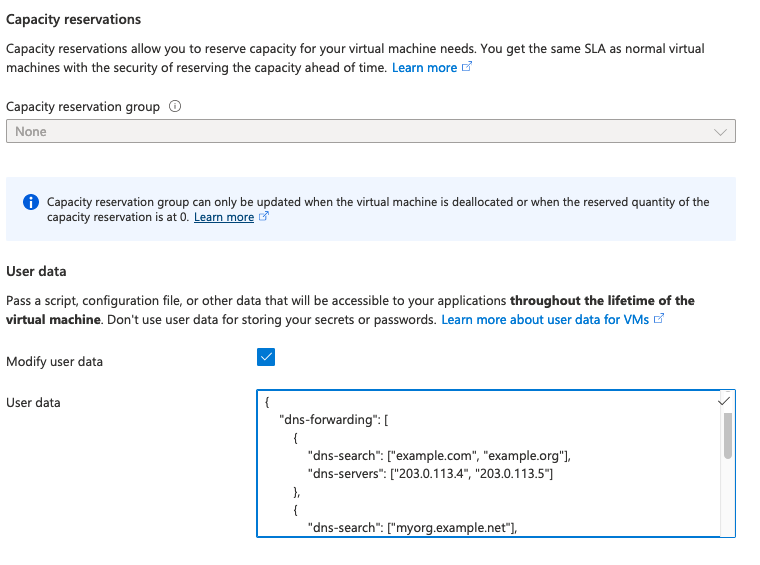
-
At the top of the page, click Save.
-
Reboot the virtual machine.
Next step
When the new machine is running, initialize the collector with a Virtana collector key.