Time range settings
To change the time range of a page at any point during your session, use the time range settings. Time range settings are available in Dashboards, Smart View, and Events so you can set the scope of the data you want to see. For example, you might want to view events from the past hour, the past 24 hours, or past week. The time range settings can help you in these investigations. When you change the time range, Virtana Service Observability updates all the data on the page.
The time range buttons are located on the right side of the toolbar on the page.

In addition to changing the time range, you can also change the time zone and create custom time ranges for quick selection.
Opening the time range settings
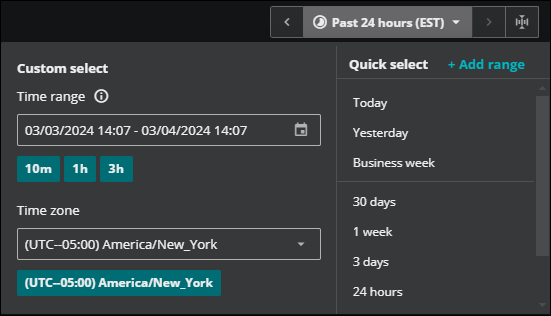
To access the time range settings, including the Custom Select and Quick select panes, click the time range button. The settings open below the toolbar.
Setting a custom time range
There are several ways to set the time range.
In Custom select, you can use any of the following methods:
-
Enter the date and time in the following format: MM/DD/YYYY HH:mm - MM/DD/YYYY HH/mm. For example, to view data for a specific three-hour range, you might enter "01/01/2024 01:00 - 01/01/2014 04:00". The minimum valid range must be at least 5 minutes.
-
Enter a time range using plain language, such as "now", "yesterday", "last week", or "Monday". The system converts the phrase to the valid format for the indicated range.
-
Enter a simple range format, such as “now-5h”. For this example, the system converts it to the valid format for the last five hours. When using this method, keep in mind the following valid time units: m(minute), h(hour), d(day), w(week), and M(month).
-
Click a preset option. Click one of the preset buttons below the field to set the range to 10 minutes, 1 hour, or 3 hours.
Be sure to select the applicable time zone for your range.
In Quick select, you can set a time range using the following methods:
-
Click one of the provided quick-select options, including Today, Business week, and 24 hours among others.
-
Click Add range to create your own quick-select option.

When adding your own time range to the quick-select options, be sure to:
-
Enter a name for the option that your users will understand.
-
Enter your time range using the same options available in Custom select.
-
Be sure to select the applicable time zone for your range.
-
Moving through time ranges
After you set a time range, you can move forward (and backward) through your data.
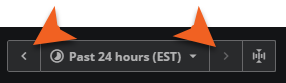
The previous and next arrows increase or decrease the time range by a single range unit. For example, if the time range is set to the past 3 hours (now-3h), the previous arrow subtracts 3 hours from the start of the time range. All the data on the page updates according to this new time range.
Manually setting time ranges
Click the Expand button to open the data timeline with slider.
When the timeline opens, you can use the slider tools to adjust the time range manually on the timeline. Your data updates for the selected range.
Use one of the following methods to adjust the time range:
-
Hold the pointer over the range bar and click it. Then, slide the current range along the timeline while keeping the same length of time in your range.

-
Hold the pointer over an endpoint and click it. Then, drag the endpoint along the timeline to increase or decrease the length of time in your range.
