Installing a Virtana Cloud Collector virtual appliance
The collector virtual appliance is distributed in a variety of formats to meet your virtualization requirements.
Collectors are deployed in pools of N+1 hosts in one subnet. In general, Virtana recommends deploying larger individual hosts rather than larger numbers of minimally-configured hosts—scale up rather than out. Also, collector pools should include no more than five hosts and smaller pools are common. Always deploy collector pools with N+1 redundancy.
Info
All hosts in a collector pool are active and collector services are load-balanced between them. Collector pools do not support an active/standby mechanism.
Info
All hosts in a collector pool must be on the same subnet. Depending on your needs, you may monitor remote subnets by either:
- allowing monitoring traffic to route between subnets.
- deploying another collector (on a separate pool) to that subnet.
The resource requirements of individual hosts in a pool depend on the number of devices to monitor and the type of monitoring to perform. A host that is more capable than the minimum requirements (next section) may not be capable enough. For assistance sizing your collector hosts, please contact your Virtana representative.
Optional: Connect your collectors using Google Cloud Private Service Connect
If your organization has strict industry compliance requirements regarding data in transit, Virtana supports connecting your collectors to Virtana Service Observability using Google Cloud Private Service Connect (PSC). For more information, see Connect to Virtana over Google Cloud Private Service Connect.
Resource requirements
Importing the virtual appliance creates a guest system that requires the following resources:
-
4 CPU cores
-
16 GiB (16384 MiB) memory
-
30 GB storage (10,000 r.p.m. serial-attached SCSI, SSD, or equivalent, such as 250 IOPS)
-
a minimum of 5 Mb/s (megabits per second) download and 5 Mb/s upload capacity
- appliances that include multiple collectors may require additional upload capacity
- appliances that use additional features such as duration thresholds may require additional download capacity
In addition, virtual appliances must be able to meet the networking requirements (next section).
Networking requirements
Info
Virtana Service Observability uses the 100.64.36.1/24 address space for communication among Docker containers. If you are already using it in your environment, please contact Virtana Support.
Required ports
SSL
The SSL port is only used during initialization.
| Direction | From | To | Protocol | Port |
|---|---|---|---|---|
| Outbound | Collector | <tenant>.zenoss.io |
TCP | 443 |
OpenVPN
The OpenVPN port is for the VPN server dedicated to your Collection Zone. The IP address of the server is provided during initialization. The hostname uses the following convention:
<tenant>-<czname>-<cznumber>-outboard.zenoss.(io|eu)
For example, acme-production-cz0-outboard.zenoss.io.
| Direction | From | To | Protocol | Port |
|---|---|---|---|---|
| Outbound | Collector | <unique>-outboard.zenoss.(io\|eu) |
UDP | 1194 |
When UDP/1194 is not an option, TCP/443 can be used for OpenVPN data traffic. However, both performance and reliability are reduced. Please contact Virtana Operations to enable this configuration.
SSH
The SSH port is for your administrative access.
By default, SSH access is limited to RFC 1918 addresses. If you require access from other addresses for a specific collector pool, contact Virtana Support.
| Direction | From | To | Protocol | Port |
|---|---|---|---|---|
| Inbound | Your network | Collector | TCP | 22 |
DNS
The DNS port is for resolving intranet addresses.
| Direction | From | To | Protocol | Port |
|---|---|---|---|---|
| Outbound | Collector | Internal DNS server(s) | UDP | 53 |
Redis cluster
The Redis cluster port allows individual collector hosts in a single network location (collection pool) to communicate among themselves.
| Direction | From | To | Protocol | Port |
|---|---|---|---|---|
| Outbound | Collector | Collector | TCP | 22250 |
Commonly-used ports
The following table identifies some of the ports that commonly-used collector services require to monitor and model devices in your environment. For more information about additional ports, see the ZenPack Catalog.
| Purpose | Direction | From | To | Protocol | Port |
|---|---|---|---|---|---|
| syslog | Inbound | syslog daemon or server | Collector | UDP | 514 |
| SNMP traps | Inbound | SNMP agents | Collector | UDP | 162 |
| SNMP queries | Outbound | Collector | SNMP agents | UDP | 161 |
| SSH | Outbound | Collector | Devices | TCP | 22 |
| WinRM over HTTP | Outbound | Collector | Devices | TCP | 5985 |
| WinRM over HTTPS | Outbound | Collector | Devices | TCP | 5986 |
In multi-host collector pools, you must assign a virtual IP address to the pool before inbound services can be enabled. For more information, please contact Virtana Support.
Dedicated VPN servers
The collector virtual machines communicate with Collection Zone instances through a VPN server that is dedicated to your organization. When you enter the collector key during the initialization process, the IP address of the VPN server that you need to whitelist is displayed.
If your organization uses more than one Collection Zone, you will have a dedicated VPN server for each Collection Zone instance.
Example configuration
The following illustration shows the network configuration for the ACME organization. The Virtana Service Observability deployment includes two Collection Zones, which is rare. Most organizations have just one.
Also:
- The SSH and DNS connections are only illustrated on one collector virtual machine. The connections are required on all collector virtual machines.
- None of the commonly-used ports are shown.

Installation overview
Please follow the documented procedure
Please follow the documented procedure (links below) every time you deploy a collector virtual appliance. In many cases, an instruction refers to specific IDs for the latest images. In the near future, a collector created with anything other than the latest published version of an appliance image may be blocked at Virtana's discretion. Cloning an existing collector to create a new collector is not supported.
Virtual machine migration
Migrating a virtual machine appliance from one cloud environment to another, or from one host operating system to another, is not supported. In cases where migration is required, the correct procedure is to:
- Deploy a new virtual machine appliance.
- Contact Virtana support to onboard the new appliance and to offboard the old appliance. Please include any changes between the old and new appliances.
- When Virtana support has finished, decommission the old appliance.
-
Install the virtual appliance on a hypervisor or in a cloud environment:
-
Connect to a Collection Zone (next section).
Initializing a collector appliance
Use these procedures to initialize a collector appliance.
To perform these procedures, you need:
-
A virtual machine created from a collector virtual appliance package.
-
The collector key for the virtual machine.
To obtain the key, please contact Virtana Support.
-
Command-line access to the console of the collector virtual machine.
-
For AWS EC2 instances, the private key of the named AWS key pair used to create the instance.
-
A terminal client that supports cut-and-paste, such as PuTTY.
A client with this feature prevents transcription errors when you add the collector key.
Adding the collector key
Use this procedure to initialize a newly-installed collector.
To perform this procedure, you need the collector key provided to you by Virtana Support through a support ticket. You must have a unique collector key, supplied by Virtana Support, for each collector you install. Re-using collector keys wastes time.
-
Gain access to the console interface of the virtual machine, through your hypervisor or through a remote shell utility such as PuTTY.
A utility that supports cut-and-paste is recommended (PuTTY does).
-
Log in to the system as
ccuser.On AWS, Azure, and IBM systems, you must have the private key of the named key pair used to create the instance.
-
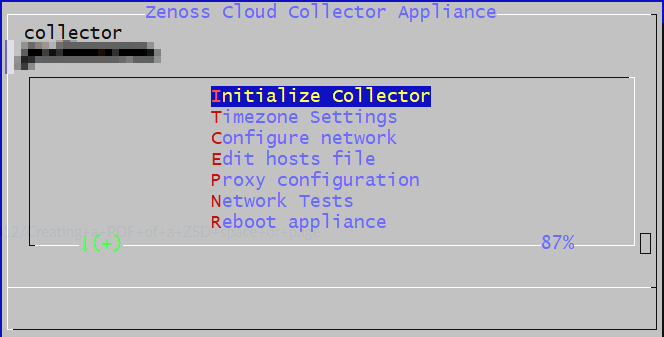
In the appliance menu, select Initialize Collector, and then press Enter.
-
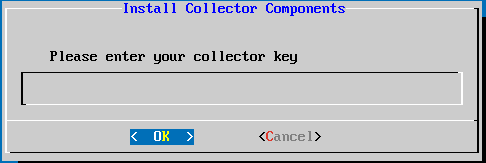
In the Please enter your collector key field, enter the collector key for this virtual machine.
To avoid transcription errors, Virtana strongly recommendeds using cut-and-paste to enter the collector key.
-
Press TAB, and then press Enter.
The menu is replaced by a dialog box that displays progress messages.
-
The first message includes the name and IP address of the VPN server that is dedicated to your organization. Use its IP address to configure your firewall.
-
If an initialization step fails, see Troubleshooting.
-
When the process is complete, press Enter to return to the appliance menu. The title of the menu is updated to include the following fields:
-
The hostname of the virtual machine.
Warning
Please do not change the virtual machine hostname.
-
The IP address of the virtual machine in your environment.
-
The virtual IP address of the virtual machine in the Virtana network reserved for your organization.
Finally, update the Virtana support ticket in which you were provided your collector key, to request Virtana complete the on-boarding of your collector appliance.
Troubleshooting
If you encounter connectivity or other issues while configuring the collector appliance, run the Zenoss connection test in the Diagnostic tools menu and report the results to Virtana Support.