Add a metric trigger
A metric trigger is used as a part of a rule that monitors a resource by assesing conditions on the specified metric at regular intervals. If the conditions are met, a notification is sent to the destinations specified in the rule.
Note
You must be assigned the Manager role to create a trigger.
Perform the following steps to create a new metric trigger.
-
Open the ADMIN > Actions page, and then click the TRIGGERS tab.
-
In the upper-right corner, click ADD TRIGGER.
-
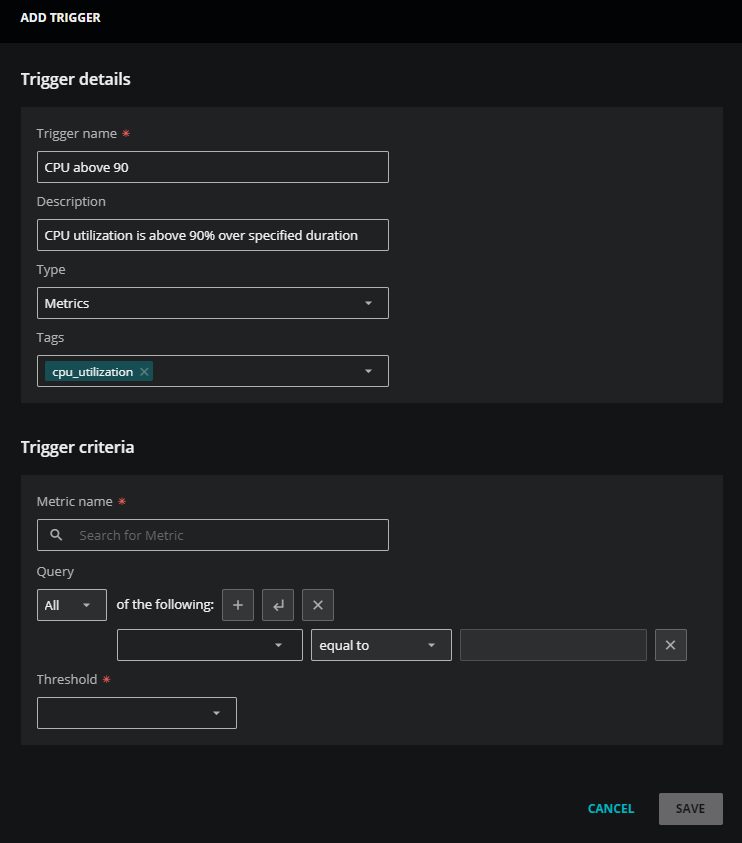
The ADD TRIGGER dialog box opens.
In the Trigger details section of the dialog box, enter the following information:
Field Description Trigger name A unique, short identifier for the trigger (required).
The name can't be changed after you select SAVE.
Description (Optional) Enter text to describe the trigger. Type In the dropdown list, select the Metrics option. You can see that the dialog box now displays additional criteria fields.
Tags (Optional) Add one or more terms to associate with the trigger. -
In the Trigger criteria section, you can specify a query to make your trigger more precise. Enter the following information:
Field Description Metric name Enter a name of a metric (required).
When you enter the first few letters of a metric name, Virtana Service Observability displays a list of names to choose from. For assistance finding a metric name, go to ADMIN > Dictionary, then select the METRICS tab
Query (Optional) Create a query to identify one or more entities that collect the metric. For more information, see Trigger queries and Metric trigger fields. Best Practice
As a best practice, use
Entity: Production State equal to Productionas a trigger criteria. This criteria can prevent matches that are "false positives" against non-production entities.For example, include this criteria to avoid matching against devices that might be in Maintenance.
To match on additional production states, consider using the
greater thanorgreater than or equal tooperators. -
To further refine your trigger, select the threshold type, and then enter the values to use in comparisons.
-
Click in the Thresholds field and select one of the following options:
-
min/max: Select this option when you want to set minimum and maximum threshold values. This option is useful when you want a trigger to alert you as soon as the condition is met.
-
min/max over duration: Select this option when you want to use duration with your minimum and maximum threshold values. This option is useful when you only want the trigger to alert you when a condition is met for more than a specified amount of time. For example, you might have a CPU utilization metric that regularly exceeds 90%, but you only want to be alerted if the utilization exceeds 90% for longer than 45 minutes. Using this option can reduce the noise of triggers that you typically ignore while focusing on the ones that are vital to your organization.
-
-
Enter both minimum and maximum values, or just a minimum or a maximum.
When... Then... Both values are specified The values define the normal range for data points of the specified metric. When data points are less then the minimum value or greater than the maximum value, the trigger matches. Just a minimum value is specified The trigger matches when the data points are less than the specified value. Just a maximum value is specified The trigger matches when the data points are greater than the specified value. The values you specify must be raw (as collected), not normalized values. The dictionary service normalizes some metric values with scale factors.
-
If you selected min/max over duration in the Threshold field, enter the duration and percentage.
-
Duration: Enter the length of time in seconds for meeting the conditions of the trigger. For example, to set a duration for one hour, enter '3600'.
-
Percentage: Enter the perecentage of the specified duration for meeting the conditions of the trigger. For example, enter '75'.
-
-
(Optional) In the last field, change the comparison type. You can select one of the following options:
-
Value: Comparisons use data point values. When you select this type, you can use positive or negative numbers for minimum and maximum values.
-
Rate: Comparisons use the rate (per second) at which the value changes. When you select this type, you can only use positive numbers for minimum and maximum values.
-
Delta: Comparisons use the difference between adjacent data points. When you select this type, you can use positive or negative numbers for minimum and maximum values.
Note
Rate and Delta comparisons are based on the last two data points recorded for a metric. They are only performed when you activate the rule associated with the metric trigger.
-
-
-
Click SAVE.


