Adding stale data triggers
In Actions, you can create a stale data trigger to notify you when Virtana hasn't received a metric or event after a specified duration of time. This feature is useful when you have important metrics or events that you expect to regularly receive, so failing to receive them would indicate a problem that requires your attention.
Stale data is data that is outdated or obsolete, and is no longer accurate or needed for your daily operations. You have essentially stopped receiving information for a metric or event and need to restore dataflow. Creating a trigger notifies you when your specified metric or event contains stale data so you can resolve the issue.
You can customize the number of notifications that you receive for stale data. For example, if a trigger matches multiple events or metrics, you can choose to send a notification for each event or metric that matches, or send a single notification for all the events or metrics that match. This is helpful if you have numerous entities that regularly send a metric like "CPU-Utilization." If your trigger matched just that metric name and Virtana stopped receiving the metric from ten entities, you could choose to receive ten notifications or just one.
Setting up stale data triggers
To set up a stale data trigger, first determine the destination and then create the trigger. Then link both the trigger and the destination to a rule. When conditions match your stale data trigger in the rule, the action service sends a message to the destination specified in the rule. In this case, you might set up the trigger and the rule such that if Virtana is no longer receiving data for the metric or event after a certain duration, your destination is notified.
A stale data notification is considered clear when Virtana receives new data for the event or metric identified in the notification. When adding your rule, be sure to turn on the Send updates option in the ADD RULE dialog box so you can receive a clear notification for these cases. If you want to continue receiving notifications about stale metrics and events while they remain stale, turn on the Repeat notification option for the rule.
Add a stale data trigger
The following steps guide you through adding details for the stale data trigger, specifying trigger criteria, and setting a time duration. The trigger is sent when one unique event or metric is met in the criteria.
Note
You must be assigned the Manager role to create a trigger.
Perform the following steps:
-
Open the ADMIN > Actions page, and then click the TRIGGERS tab.
-
In the upper-right corner, click ADD TRIGGER.

-
The ADD TRIGGER dialog box opens.
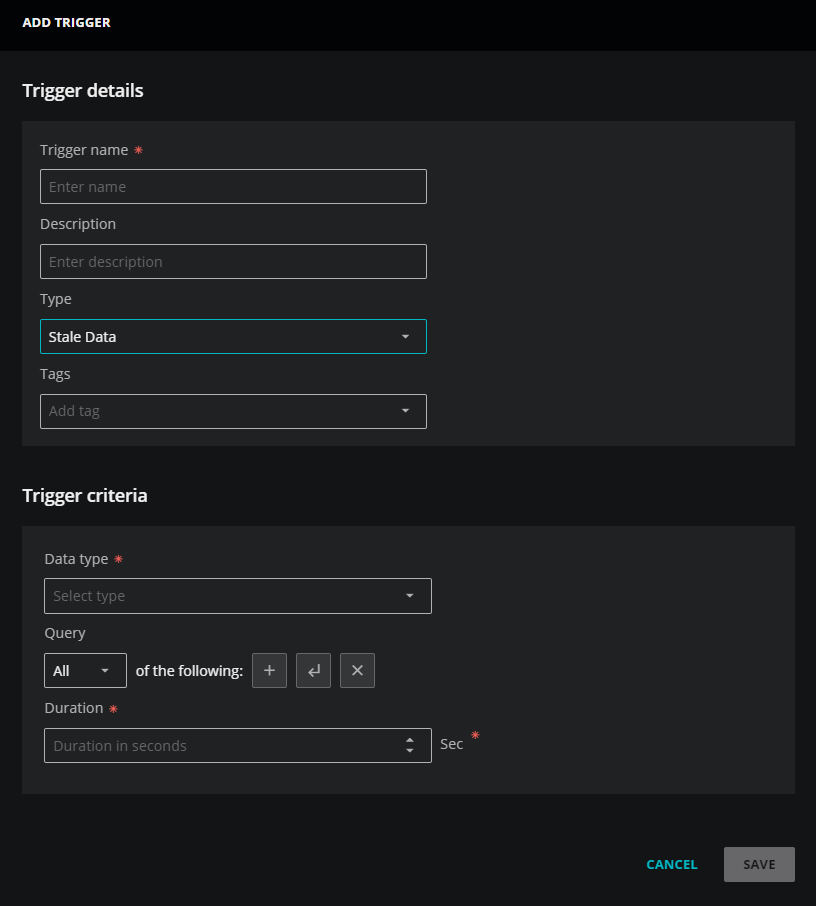
In the Trigger details section, enter the following information:
Field Description Trigger name A unique, short identifier for the trigger (required).
The name can't be changed after you select SAVE.
Description (Optional) Enter text to describe the trigger. Type In the dropdown list, select the Stale Data option. You can see that the dialog box now displays additional criteria fields.
Tags (Optional) Add one or more terms to associate with the trigger. -
In the Trigger criteria section, create a query to identify specific stale data. Enter the following information:
Field Description Data type Enter the type of data to include in the query. You can select Event or Metric. This is a required field.
- If you select Metric, you must enter the name of the metric. Click in the Metric name field and enter the first few letters of a metric name. Virtana Service Observability displays a list of names to choose from. For assistance finding a metric name, go to ADMIN > Dictionary, then select the METRICS tab.
- If you select Event, you must enter a query in the Query field.
Query Create a query to identify one or more entities that collect the metric. For more information, see Trigger queries and Metric trigger fields. Duration Enter the length of time in seconds for meeting the conditions of the trigger. For example, to set a duration of one hour, enter '3600'. This is a required field
The minimum value is 600 seconds, or 10 minutes. The maximum value is 86400 seconds, or 24 hours.
Notification condition Choose how many notifications you want to receive when the conditions for a trigger are met because data has become stale. This is useful when you have many entities that frequently send metrics like "CPU-Utilization." If your trigger matches only the metric name and Virtana stops receiving the metric from multiple entities, you can choose to receive a single notification for all impacted entities or a separate notification for each entity.
Options include:
- One notification for each matched item
- One notification for all matched items
For more information, see Trigger queries and Event trigger fields.
Best Practice
As a best practice, use
Entity: Production State equal to Productionas a trigger criteria. This criteria can prevent matches that are "false positives" against non-production entities.For example, include this criteria to avoid matching against devices that might be in Maintenance.
To match on additional production states, consider using the
greater thanorgreater than or equal tooperators. -
Click SAVE.