Maintenance Windows
In Maintenance Windows, you can create and manage maintenance windows for your entities. You can schedule a maintenance window for a specific entity or a collection of entities. For example, you might want to set up a maintenance window to perform configuration changes or reboot an entity.
Maintenance windows help you define a schedule for when to perform potentially disruptive actions on your entities, such as patching an operating system or installing software updates. Each maintenance window has a name, a schedule, a duration, and a set of targeted entities. You can also add tags to help you identify and sort your windows and entities.
When you create a maintenance window, you can define the notifications you receive during the duration. For example, you might want to notify your team when a maintenance window starts and then again when it ends. Use the Actions page when scheduling your maintenance window to set up these notifications.
For more information about setting up notifications, see Setting up maintenance window rules and triggers and Working with triggers.
To get started scheduling maintenance windows, see Scheduling maintenance windows
Note
The system supports a maximum of 5,000 maintenance windows. You will receive a notification if you attempt to create or run a maintenance window that exceeds this limit.
Opening Maintenance Windows
When you open Maintenance Windows, you are on the TIMELINE tab. Here, you can view your scheduled, in-progresss, and completed maintenance windows.

To create and manage maintenance windows, do the following:
-
The Virtana Service Observability header is visible on all tabs. In the header, click ADMIN, then Maintenance Windows. Click the CONFIGURATION tab.
Note
Your account must be assigned the Manager role to create and manage maintenance windows.
To view current maintenance windows, click TIMELINE. To view completed and in-progress maintenance windows, click ACTIVITY.
You can also create maintenance windows for entities in Inventory:
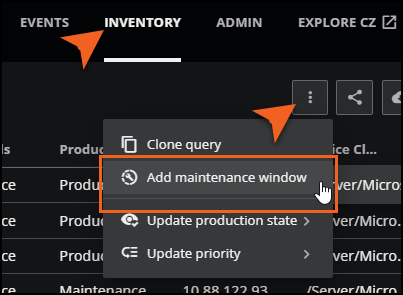
- In the header, click INVENTORY, and create a query. Select the entities to include for maintenance, then click Actions options, and select Add maintenance window.
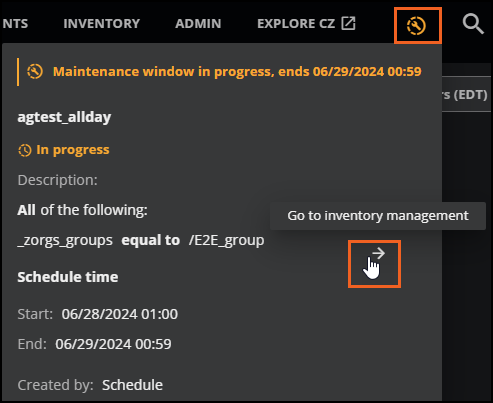
You can view details for in-progress maintenance windows from Events, Dashboards, SmartView, and Inventory. When a maintenance window is started, the in-progress icon appears in the Virtana Service Observability header.

- To open Maintenance Windows, hover your mouse over the icon to display the details about the maintenance window, then click the arrow to view more details in Maintenance Windows.
Tour of Maintenance Windows
Maintenance Windows opens with the TIMELINE tab selected so you can view your maintenance windows in a calendar view.
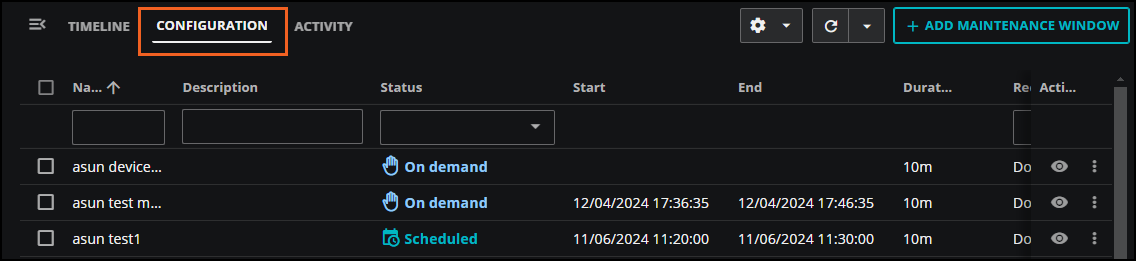
Click the CONFIGURATION tab to view a table of your scheduled and on-demand maintenance windows. You can filter the table to show only in-progress, on demand, or scheduled windows or a combination of two types.
Click ACTIVITY to view in-progress and completed maintenance windows. Click Activity details (eye icon) to view the details for a specific maintenance window or troubleshoot errors that occurred during a run. You can also click a completed maintenance window in the TIMELINE tab to open the ACTIVITY tab.
Maintenance window calendar
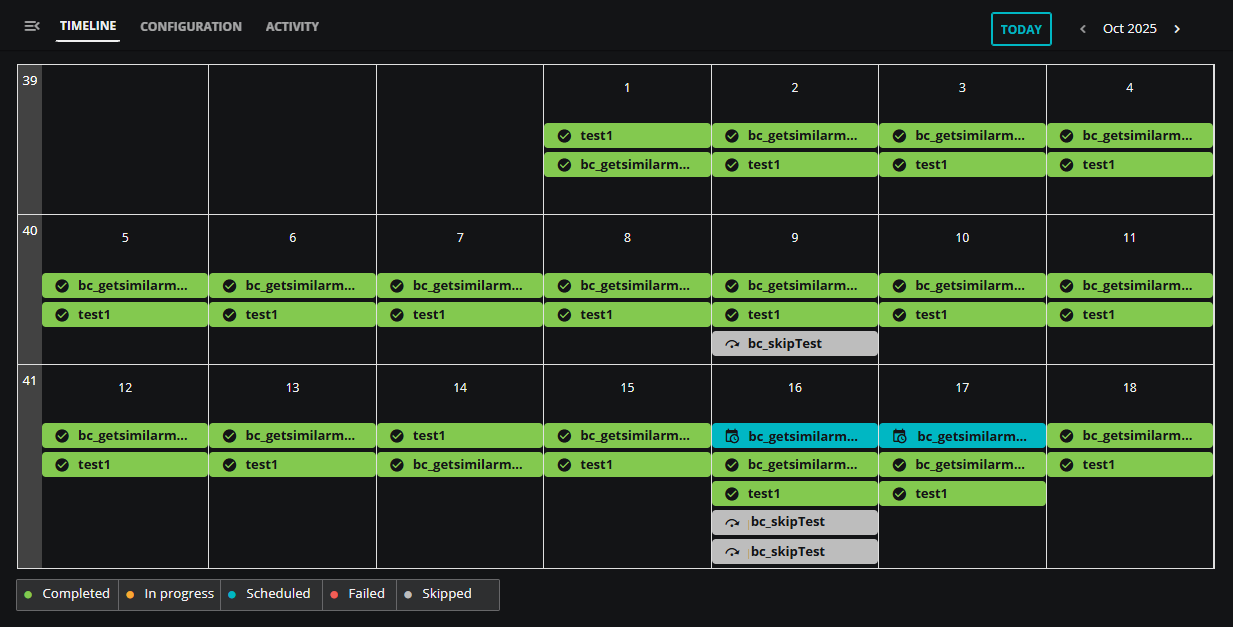
The calendar view in TIMELINE provides an interactive visual snapshot of maintenance windows for the day, week, or month, similar to a calendar view of appointments. Use the calendar navigation to scroll forward or back to view completed maintenance windows and future maintenance windows. Days containing five or more maintenance windows display an indicator showing the total count, for example, "2 more". Click TODAY to return to the current day, week, or month.

To filter your maintenance windows in the calendar, click the corresponding button to select or clear that type of maintenance windows in the calendar:

Windows are displayed by day and time, and are color-coded by status:
-
Completed (green): This maintenance is completed. To view the details of completed maintenance windows, click the window to go to the Activity tab, or just click ACTIVITY.
-
Partially Completed (yellow): This maintenance has finished the standard "In Progress" phase, but can’t be fully verified as "Completed." The isssue could be that the change wasn't communicated correctly to Collection Zone (CZ), runtime errors occurred, or the entities were part of multiple maintenance windows that started and ended simultaneously.
If you see a "Partially Completed" state for a maintenance window, go to CZ and check if the Production State is updated as expected. If you see "Partially Completed" maintenance windows on a regular basis, contact Virtana Support.
-
In progress (orange): This scheduled maintenance is occurring now.
-
On demand (blue): This maintenance isn't part of a recurring schedule.
-
Scheduled (teal): This maintenance is scheduled to occur, but isn't occurring now.
-
Failed (red): This maintenance window did not start or finish as expected. To view the details of a failed maintenance window, click the window to go to the Activity tab, or just click ACTIVITY. To troubleshoot what went wrong, open the details panel for the window and go to Annotations.
-
Skipped (gray): The scheduled maintenance is skipped. Maintenance windows are automatically skipped when no entities that match the criteria for the maintenance window are found. Also, you can manually skip a maintenance window.
There are several tasks you can do in the calendar view of TIMELINE.
-
To quickly view information about a maintenance window, hover over the maintenance window "appointment" to view the duration and the start and end times.
-
To view further details, click the scheduled maintenance window. The table in CONFIGURATION automatically filters to show you the information for the selected window. If you click an in-progress window, you can view it in ACTIVITY.
-
If you need to take action on a selected window, click More actions in the table and select an option, such as starting or ending the maintenance window, skipping a run, or other actions.
-
To remove the filters in CONFIGURATION and return to the full table view, click Settings and then click Restore defaults.
-
Maintenance window table
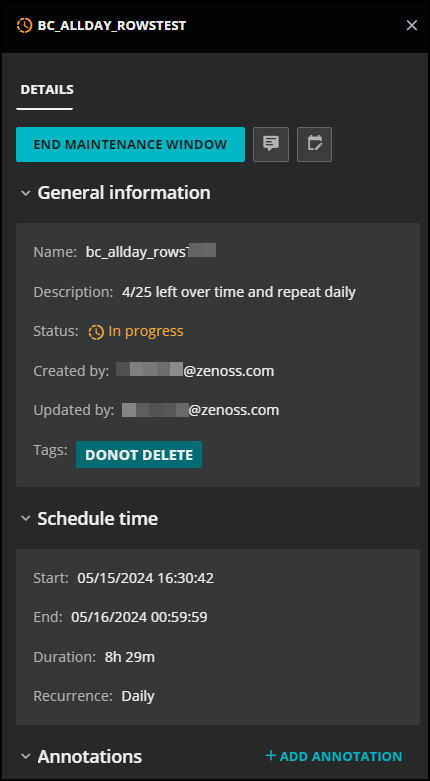
In CONFIGURATION, you can view maintenance windows in table rows and sortable columns. You can reorder, resize, and remove columns to customize your view. For a closer look at individual maintenance windows, click Maintenance window details (eye icon) in the Actions column for the row. In the details panel that opens, you can view more information. In addition, you can start or end the maintenance window and other actions.
Within the table, you can perform several actions to help you manage your maintenance window information.
Hide or reorder columns
You can change how the properties appear in the table. To make changes, click Settings (gear icon), and then click Adjust columns in the menu. In the ADJUST COLUMNS dialog box that opens, you can select or clear the available columns, and change the order of the columns in the table.
To revert back to the initial layout, click Settings and then click Restore defaults.
Filter by column
If you have a lot of maintenance windows to view, you can filter them by column.
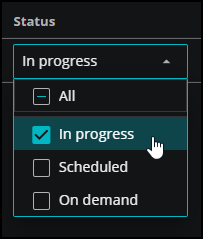
To filter the windows in the table, enter filter text in the column header. For example, if you want to view just those maintenance windows currently in progress, click in the Status column and select In progress.
To remove filters from all columns, click Settings, then click Clear filters.
Sort rows
If you have a lot of windows to view, you can use the additional sorting options in the column. Click the menu next to the column name and do any of the following actions:
-
Sort the rows in ascending or descending alphabetical order, or clear any previously applied sort options.
-
Autosize the specified column or all the columns in the table, or choose to autosize all the column contents, but not the header.
Add annotations
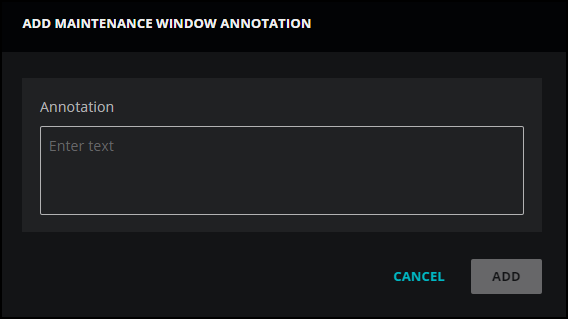
You can add notes to maintenance windows that are currently in progress. This is useful if you want to record the reason for ending a maintenance window early or changing the duration. When you click Add annotation, the Add Maintenance Window Annotation dialog box opens where you can enter a plain text message to associate with the selected maintenance window.
You can add a note from several locations within Maintenance Windows:
-
In the table on the CONFIGURATION tab, navigate to the row of the in-progress maintenance window that you want to annotate. Click the Add annotation button in the toolbar to open the Add Maintenance Window Annotation dialog box where you can enter a plain text message to associate with the selected maintenance window.
-
In the table on the CONFIGURATION tab, navigate to the row of the in-progress maintenance window, and click the More actions (vertical ellipse) menu. Select Add annotation.
-
In the table on the CONFIGURATION tab, open the details panel for the in-progress maintenance window that you want to end. Click the Add annotation button to open the Add Maintenance Window Annotation dialog box. Alternatively, click ADD ANNOTATION at the bottom of the details panel to open a text box.
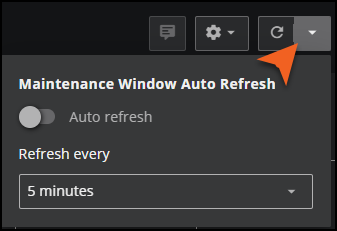
Refresh table
You can refresh the information in the table automatically or on demand.
-
Refresh now: Click to refresh the table now.
-
Refresh options: Set a refresh interval. When you click Refresh options, the Maintenance Window Auto Refresh box opens. You can activate the auto refresh option and enter a refresh interval. Options include 1, 3, 5, and 10 minutes.
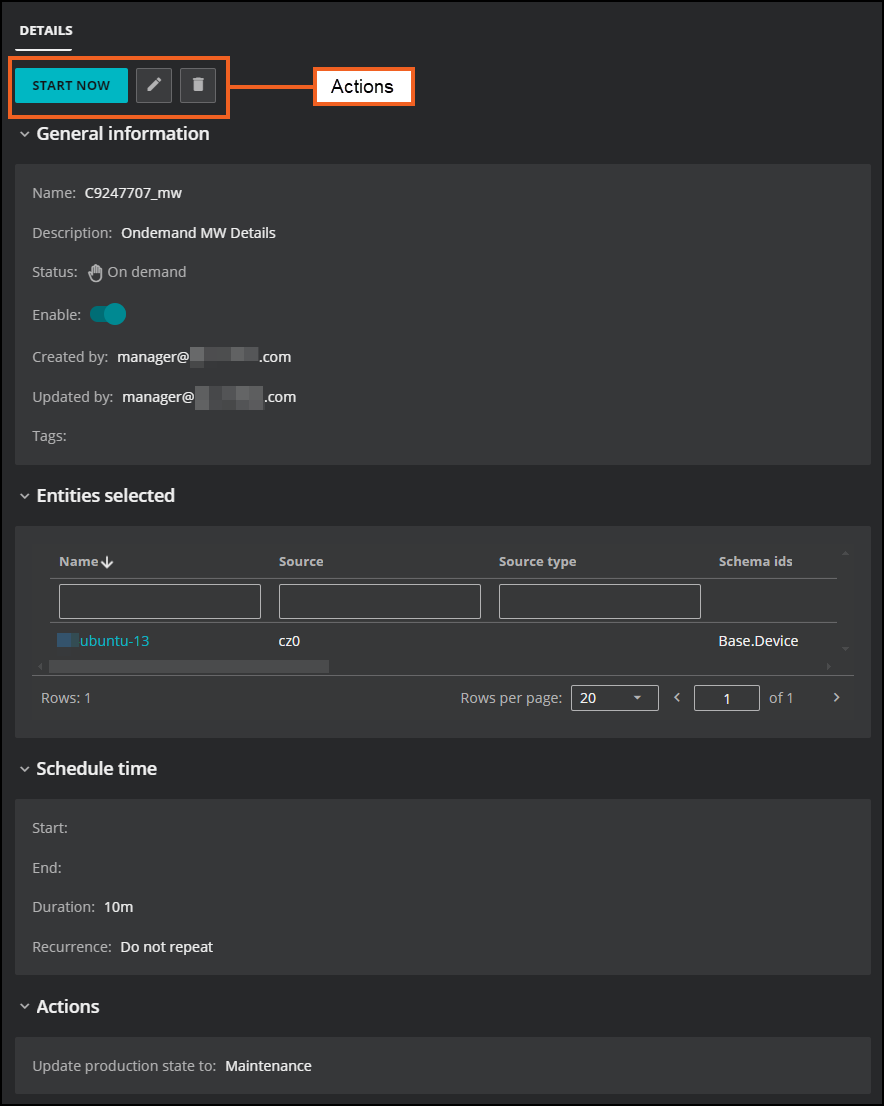
Viewing details for a maintenance window
To view the details of an entry in the table in the CONFIGURATION tab of Maintenance Windows, select the Maintenance window details (eye icon) in the Actions column.
You can perform actions on the maintenance window depending on the current status of the window. For example, you can end the run for a maintenance window that is currently in progress or change its duration. You can also start the run for an on demand maintenance window. See Running maintenance windows.
Viewing details for in-progress maintenance windows
If you are in other Virtana Service Observability features, including Events and Dashboards, you can view details for maintenance windows that are currently in progress. When a maintenance window is started, the in-progress icon appears in the Virtana Service Observability header.
Hover your mouse over the icon to display the details about the maintenance window. To further inspect the maintenance window, click the arrow icon to view the window details in Maintenance Windows.
Note
This arrow icon is only visible if you have applicable permissions. Your account must be assigned the Manager role to open Maintenance Windows.
Scheduling maintenance windows
You can schedule a maintenance window for specific entities within a specified time window. This feature is useful when you want to plan maintenance within your system and make your teams aware of these maintenance windows. In addition, you can configure the production state to automatically update to "Maintenance" state while the window is active. This is useful to mute event notifications for the affected entities.
Note
When you open the ADD MAINTENANCE WINDOW dialog box, a panel of scheduled maintenance windows appears on the right side. As you enter criteria for your maintenance window, this panel displays any scheduled maintenance windows that overlap with the criteria you provide, if any. When scheduling maintenance windows with overlapping timeframes as well as matching criteria, the similar maintenance windows appear in the Scheduled maintenance windows panel with a warning messsage in orange text.

Before you save, you will be asked to confirm if you wish to override this warning and save the new window, allowing the entity to exist in multiple similar maintenance windows simultaneously. This aligns with the Zenoss API's force flag functionality.
Create a maintenance window
You can create a new maintenance window in Maintenance Windows and in Inventory. You must be assigned the Manager role to create a maintenance window.
-
If you haven't already done so, do one of the following:
-
Open ADMIN > Maintenance Windows. In the upper-right corner of the CONFIGURATION tab of the Maintenance Windows page, click ADD MAINTENANCE WINDOW.
-
Open INVENTORY and open a saved template or create a query. Select one or more entities and click the Actions Options in the toolbar, then select Add maintenance window.
-
-
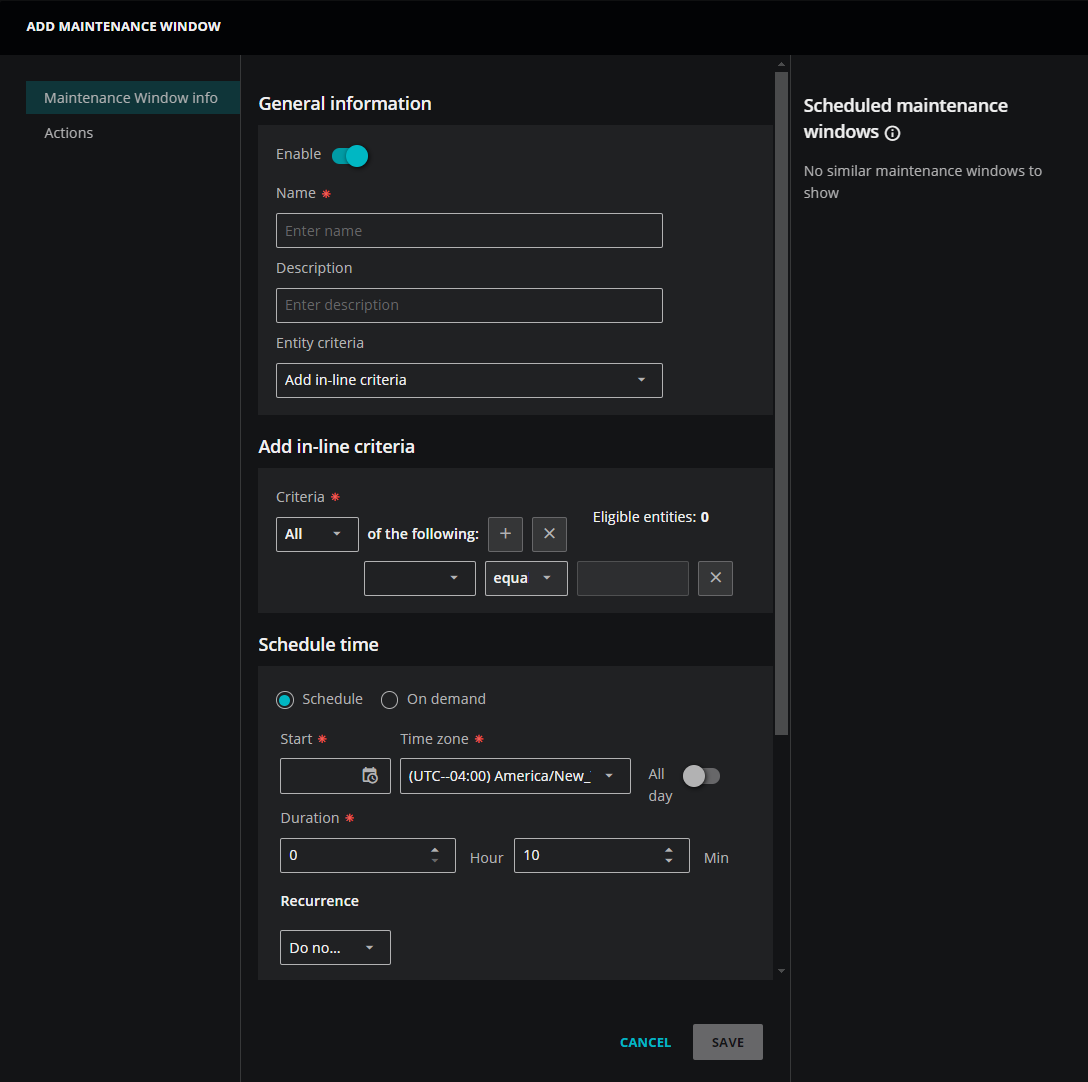
The ADD MAINTENANCE WINDOW dialog box opens. Be sure the Maintenance Window info option is selected in the left panel.
-
Set the Enable option to activate the maintenance window or deactivate it. This option is enabled by default.
-
In the General information section, specify the maintenance window.
-
In the Name field, enter a name for this maintenance window configuration. Maintenance window names can't be changed after the ADD MAINTENANCE WINDOW dialog box is saved.
-
(Optional) In the Description field, enter text to describe the maintenance window configuration.
-
In the Entity criteria field, leave the option set to Add in-line criteria so you can define the scope of entities to include in this maintenance window.
-
-
In the Add in-line criteria section, create a query to identify specific entities or groups of entities for your maintenance window.
Note
You can create a maintenance window even when no entities currently match the criteria. This is useful when you want to create the maintenance window now for entities that you are adding to the system later. If the maintenance window runs before the entities are added, the maintenance window is marked with the status of Skipped. You can view this status in the Timeline and Activity tabs.
To learn more about building your query, see Best practices for building queries in this article, or see Criteria builder.
-
Define your maintenance window. In the Schedule time section, specify the following scheduling requirements:
-
Determine if you want to schedule the maintenance window or run it on demand as needed. Select one:
-
Schedule: Select this option to schedule a maintenance window or set of maintenance windows to run at a specific time. For example, you might want to run your maintenance window every week at 2:00 AM in the New York time zone.
-
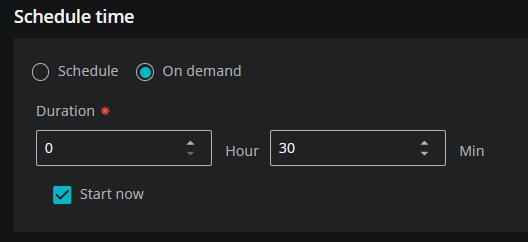
On demand: Select this option to create only one specific maintenance window. You can run your maintenance window as needed, including immediately after saving. For on demand windows, you only need to specify the Duration and if you want the window to Start now.
-
-
If you selected Schedule, then enter your date and time requirements.
Specify a start time and corresponding time zone in Coordinated Universal Time (UTC) format. For example, if you want to start your maintenance window at 2:00 AM in the New York time zone, then enter
MM/DD/YYYY 02:00and(UTC--5:00) America/New_York.-
Start: Select the start date and time of the scheduled maintenance window. This field uses a 24-hour clock. For example, to enter a start time of 5:30 PM, select 17:30 in the dropdown menu.
-
Time zone: Select the time zone in UTC format.
-
All day: Schedule the maintenance window for 24 hours to begin at 12:00 AM (midnight) on the specified start date. If you turn on this setting, you don't need to set the start time or duration.
-
-
Specify the duration of the maintenance window. In the Duration field, enter how long the maintenance window is active in hours or minutes. The minimum duration is 10 minutes.
-
Determine if you want the maintenance window to repeat or not. In the Recurrence field, specify:
-
Do not repeat: The maintenance window runs only once.
-
Repeat every: Set a recurrence of a specified number of days, weeks, months, or years. For example, if you want your maintenance window to run once a month, enter 1 in the value field and Month in the unit field. You can further define the schedule by selecting to run the maintenance window on the last day of every month.

-
Day: Can be set to run every day, every other day, or every indicated number of days at the specified time in the Start field. For example, if you set a recurrence of 2 days, the maintenance window will run every other day.
-
Week: Can be set to run every week, every two weeks, or every indicated number of weeks, starting on the selected day and time specified in the Start field. Optionally, change the day of the week or add multiple days in the day picker. For example, you might schedule a maintenance window to run every two weeks on Wednesdays and Saturdays. In this case, use the day picker to indicate the days of the week for the recurrence.
-
Month: Can be set to run monthly, every other month, or every indicated number of months, starting on the day and time specified in the Start field. Optionally, you can select to run the window on the last day of the month or a specific day of the month. For example, if you specify the 7th of the month as the start date with a recurrence of 2 months, the maintenance window will run on the 7th of every other month.
-
Year: Can be set to run every year or every indicated number of years, starting on the day and time specified in the Start field, then every scheduled year on that same date and time thereafter. For example, if you specify October 30th, 2024 as the start date with a recurrence of 1 year, the maintenance window will run on every subsequent October 30th.
-
Note
Recurrences don't expire. If you want to discontinue your maintenance window schedule, even temporarily, you can deactivate it in the details panel. Alternatively, you can select Edit in the Actions column to deactivate it.
-
-
If you selected On demand, specify if you want to start the window now.
-
If you want to run the maintenance window when saving this window, select the Start now check box.
-
If you want to save this maintenance window without starting it now, clear the Start now check box.
-
-
-
In Actions, determine how to update the production state of entities during the maintenance window and after the window finishes.

-
In the Update a production state to field, select a production state for the entities during the maintenance window. The default state is Maintenance.
-
(Optional) Choose the production state you want the entities to be in after the maintenance window finishes:
-
Turn on Override exit production state and select the production state for the entities when they exit the maintenance window, such as Pre-Production or Production.
-
Turn off this option if you want the entities to return to the production state they were in before the window started. This is the default setting.
-
-
-
(Optional) In Tags, add one or more terms to associate with the maintenance window. Tags are useful when sorting windows in Maintenance Windows. For example, you can search or sort by a "Daily" tag to find all your maintenance windows that run daily.
-
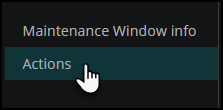
(Optional) Click the Actions page to set up a maintenance trigger to notify you or your team when the maintenance window starts or ends. You can also set up a maintenance trigger later.
-
Click SAVE.
Note
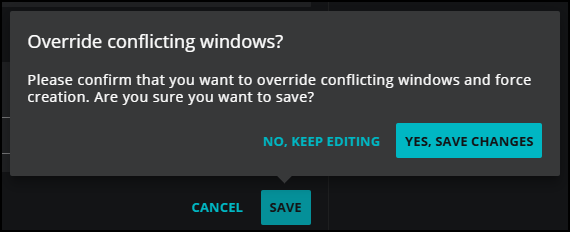
You can schedule maintenance windows with overlapping timeframes and matching criteria that may include the same set of entities. Before you save, you will be asked to confirm if you wish to override any conflicts and save the new window, allowing entities to exist in multiple similar maintenance windows simultaneously.
Setting up maintenance window rules and triggers
When you create your maintenance window, you can also create a maintenance rule to notify you when the maintenance window starts or ends. This feature is useful when you want to notify your teams that an entity or group of entities is in maintenance for a period of time. To get started, click Actions in the ADD MAINTENANCE WINDOW dialog box to display a draft maintenance rule associated with your maintenance window.
-
First, create the new trigger definition. The trigger criteria automatically includes the name of your maintenance window and any tags you added.
-
Next, select the state of the maintenance window to trigger notifications, such as on-start. Alternatively, you can select a pre-existing trigger.
-
Finally, determine the destination to send notifications and then save the rule. When conditions match your maintenance trigger in the rule, the actions service sends a message to the destination specified in the rule.
For example, you might want to notify your team in Slack when a set of Linux devices goes into maintenance. You can set the trigger criteria and the rule such that when your specified maintenance window with a tag of "Linux" begins a maintenance routine, members in your Slack destination are notified.
Note
You can also add maintenance triggers in Actions.
Add a maintenance rule and trigger
The following steps guide you through adding details for the maintenance rule and trigger, including specifying trigger criteria, selecting a destination, and saving the rule. The trigger is sent when the conditions are met in the criteria.
Note
You must be assigned the Manager role to create a rule or trigger.
Perform the following steps:
This task assumes you are in the ADD MAINTENANCE WINDOW dialog box.
-
After entering the criteria for your window, click ACTIONS to create the maintenance rule.
-
Click CREATE RULE. The rule form opens with some of the field pre-filled.

-
As a best practice, first create the trigger. In the Create a new trigger section, enter the following:
-
Go to the Create new trigger section, and enter the following trigger details:
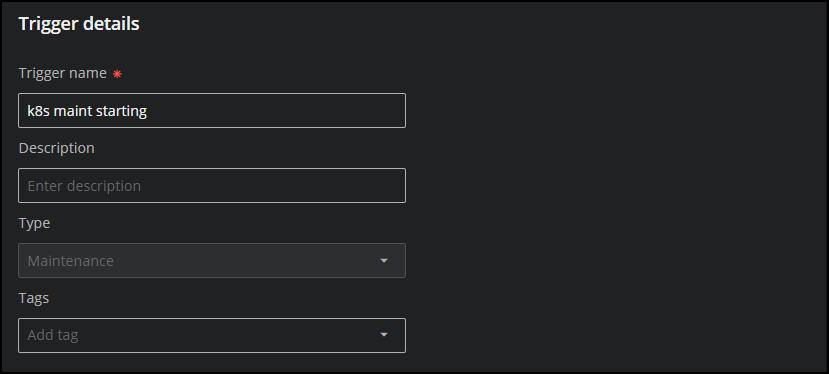
Field Description Trigger name A unique, short identifier for the trigger (required).
The name can't be changed after you select SAVE.
Description (Optional) Enter text to describe the trigger. Type In the dropdown list, Maintenance is already selected. You can't edit this field.
Tags (Optional) Add one or more terms to associate with the trigger. -
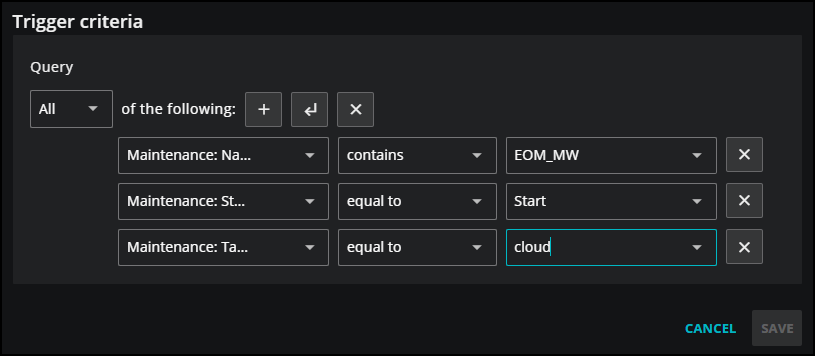
The Trigger criteria is pre-filled with the criteria you entered in the Maintenance window info page. Verify the simple clauses containing the name of your maintenance window and any tags you added.
-
In Maintenance window state, select the appropriate maintenance state criteria in the dropdown menu. You can choose:
-
Pending start: The notification is triggered when the maintenance window is ready to start, but has not yet started. This is useful when you want to provide your users with additional time to prep for the maintenance window. For example, they will receive a notification that states that the maintenance window will start in 30 minutes.
-
Start: The notification is triggered at the start of the maintenance window.
-
End: The notification is triggered at the end of the maintenance window.
-
Failed: The notification is triggered when the maintenance window fails to start or finish as expected. This is useful when you want to troubleshoot why a maintenance window failed.
-
-
Click SAVE.
-
-
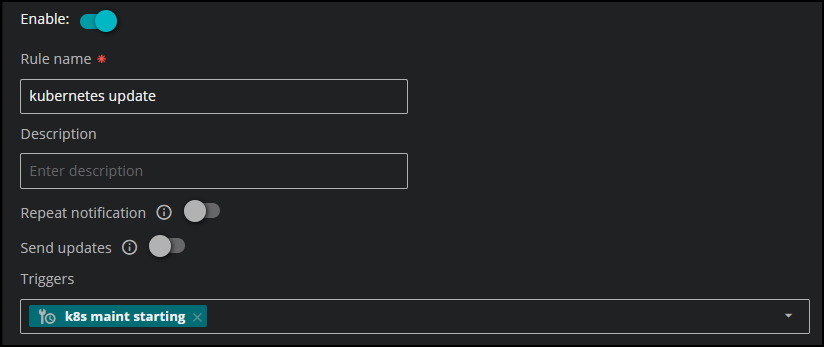
Specify the general conditions for the rule:
Field Description Enable Turn on if you want to activate the rule. Turn off to deactivate the rule. The default is active. Rule name Enter a unique, short identifier for the rule. This is a required field.
The name of a rule can't be changed after you save it.
Description Enter text to describe the rule. Repeat notification Decide whether to repeat the action of sending notifications each time a trigger matches. The default is not to repeat notifications.
When this option is enabled, interval fields open so you can specify a repeat interval. The interval is used to suppress notifications for matching triggers until the interval elapses. To ensure that notifications for all matching triggers are sent, set the amount of time to zero.
- Repeat interval — Enter the amount of time for the interval.
- Interval type — Enter the unit of time for the interval in Seconds, Minutes, or Hours.
Send updates Decide whether to send notifications when the conditions that previously matched a trigger change significantly. For example, when an event is closed, acknowledged, or changes severity. The default is not to send updates.
-
If you created a new trigger in Step 3, then the Triggers field now shows the trigger you just created. Alternatively, you can pick a pre-existing trigger in the Triggers dropdown menu.
-
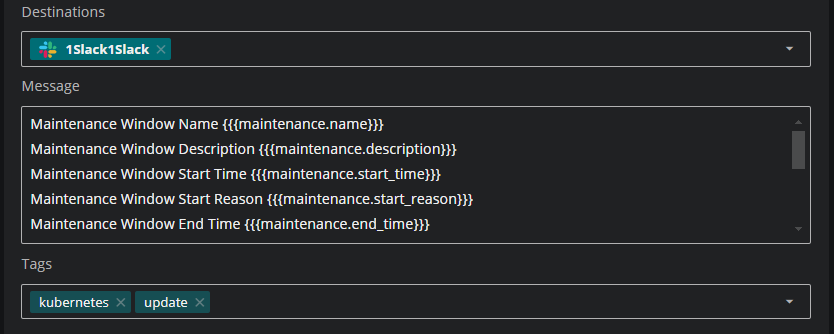
Determine the destination for sending notifications. You can select a destination in the menu or create a new one.
-
Enter the text to send to destinations. You can include one or more templates in the text. Slack and Webhook destinations receive the customized message defined in a rule, while email destinations receive the message defined in the Subject and Message body fields of a destination.
-
In Tags, enter one or more terms to associate with the rule.
-
Click SAVE. You can now see your rule saved to the maintenance window.
-
You can add more rules or, if finished, click SAVE. The maintenance window and trigger are saved.
Editing a maintenance window
You can edit an existing maintenance window to change its details or criteria.
-
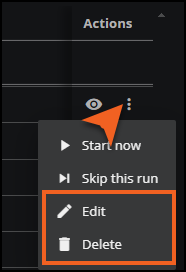
To edit, click Edit (pencil icon) in the row containing the maintenance window that you want to change. The EDIT MAINTENANCE WINDOW dialog box opens. After making your changes, click SAVE.
Deleting a maintenance window
You can delete an existing maintenance window.
- To delete a maintenance window, click Delete (trashcan icon) in the row containing the maintenance window that you want to remove. A dialog box opens asking you to confirm your deletion. Click YES.
Running maintenance windows
You can start a maintenance window on demand, end its run early, or change its duration while it's in progress. You can also skip the next scheduled run. These tools are useful when you need to make quick adjustments to the schedule of a maintenance window.
Start a maintenance window
You can run a maintenance window from several locations in Virtana, including several within Maintenance Windows :
-
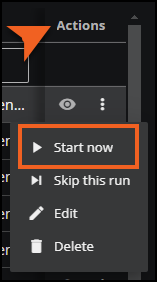
In the calendar view on the TIMELINE tab, click the maintenance window "appointment" to open it in CONFIGURATION. Click the More actions (vertical ellipse) menu and select Start now.
-
In the table on the CONFIGURATION tab, navigate to the row of the maintenance window that you want to run, and click the More actions (vertical ellipse) menu. Select Start now.
-
In the table on the CONFIGURATION tab, open the details panel for the maintenance window that you want to start. Click START NOW.

End a maintenance window
You can end maintenance window that is currently in progress from several locations within Maintenance Windows:
-
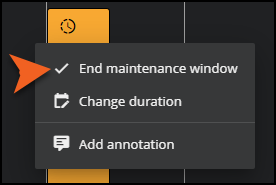
In the calendar view on the TIMELINE tab, navigate to the in-progress maintenance window "appointment" and click the More actions (vertical ellipse) icon. Select End maintenance window.
-
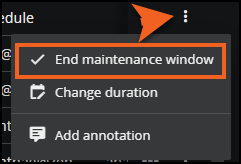
In the table on the CONFIGURATION tab, navigate to the row of the in progress maintenance window that you want to end, and click the More actions (vertical ellipse) menu. Select End maintenance window.
-
In the table on the CONFIGURATION tab, open the details panel for the in-progress maintenance window that you want to end. Click End maintenance window.

Change duration
You might need to shorten or extend the duration of a maintenance window that is already in progress. When you select to change the duration, a dialog box opens:
You can select to change the duration of an in-progress maintenance window from several locations:
-
In the calendar view on the TIMELINE tab, navigate to an in-progress maintenance window "appointment" and click the More actions (vertical ellipse) icon. Select Change duration.
-
In the table on the CONFIGURATION tab, navigate to the row of the in-progress maintenance window that you want to run, and click the More actions (vertical ellipse) menu. Select Change duration.
-
In the table on the CONFIGURATION tab, open the details panel for the maintenance window that you want to start. Click the Change duration button.
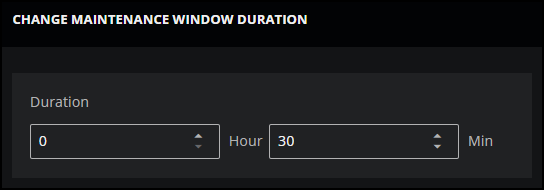
When you click Change duration, the CHANGE MAINTENANCE WINDOW DURATION dialog box opens. Adjust the duration and click SAVE.
Skip a maintenance window
You might need to skip a maintenance window. For example, a scheduled maintenance window might fall on a high-volume day, so you want to skip maintenance that week. When you select to skip a run, a confirmation box appears:
You can select to skip running a maintenance window from several locations:
-
In the calendar view on the TIMELINE tab, click the maintenance window "appointment" to open it in CONFIGURATION. Click the More actions (vertical ellipse) menu and select Skip run.
-
In the table on the CONFIGURATION tab, navigate to the row of the maintenance window that you want to skip, and click the More actions (vertical ellipse) menu. Select Skip run.
-
In the table on the CONFIGURATION tab, open the details panel for the maintenance window that you want to skip. Click the Skip run button.
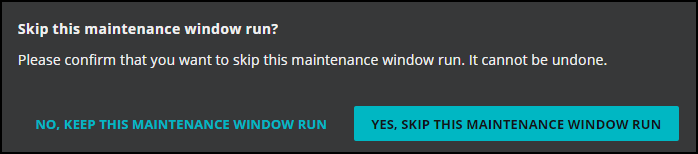
When click Skip run, a confirmation box opens. Click YES, SKIP THIS MAINTENANCE RUN.
View maintenance windows activity
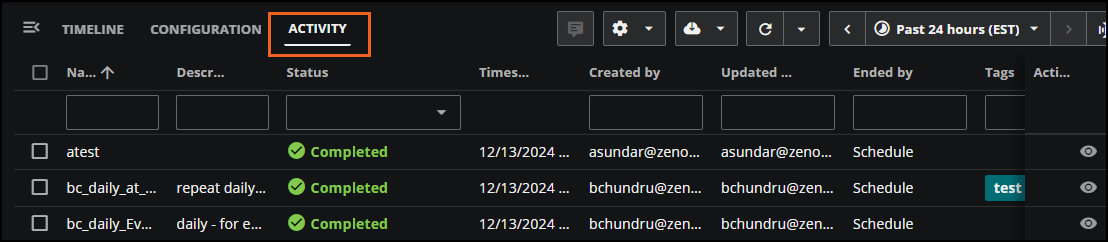
The ACTIVITY tab on the Maintenance Windows page displays the log of completed, failed, and in-progress maintenance windows in a table. The default time range is the past 24 hours, but you can change it to any range within your data retention period.
The ACTIVITY table is a read-only table, but you can perform a few tasks to help you audit or troubleshoot issues:
- To view the details of an entry, select the Maintenance window details (eye icon) in the Actions column. In the panel that opens, you can view the activity log, creation history, and the schedule. You can also add an annotation.
- To filter activity rows, enter a search term at the top of a column.
- To configure the rows per page and navigate the pages, use the page buttons in the bottom-right side of the page.
- To download the activity in HTML, CSV, Excel, or JSON format, click the Export table button in the toolbar. You can export up to 1,000 rows of your Activity table.
Best practices for building queries
Keep the following best practices in mind when creating query criteria for maintenance windows. These best practices and limitations are especially useful when configuration maintenance windows on Collection Zone maintenance windows.
-
Include a
schemaIdofBase.Device: Most maintenance windows target a collection zone (CZ) datasource. Including this schema ID targets the cloud entities that correspond to devices, which makes the sync to the CZ more efficient on stacks where sync is enabled.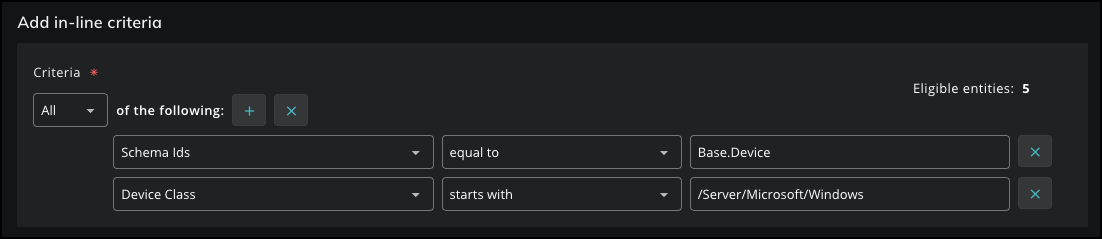
-
Limit the number of entities: The current upper limit for entities on a maintenance window is 5,000. Don't exceed this number.

-
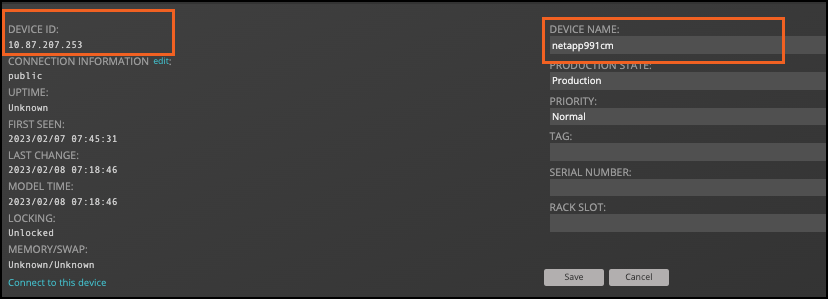
Map
Device IDandDevice Namecorrectly: Note the following mappings between fields in Infrastructure > Devices > CZ Device Overview and Service Observability (cloud):-
The value in Device ID maps to the value in Device in Service Observability (Cloud).
-
The value in Device Name maps to the value in Name in Service Observability.
These values don't have to be the same.
-
-
Use organizers to filter devices: You can add organizers to the query criteria to select a subset of devices to include in a maintenance window.
