Managing dynamic services
Use the Services panel to create, edit, and manage dynamic services and their members. You can also configure impact policies on service nodes from the Impact view.
Create a dynamic service
To create a dynamic service, select the folder in the Services panel where you want to add it, or select Dynamic Services to add it at the top level. The new service is added to whichever item is currently selected in the Services panel.
- In the Services panel, select DYNAMIC SERVICES.
- Select the folder where you want to add the new service, or select Dynamic Services to add it at the top level.
- Click +NEW SERVICE. The ADD NEW DYNAMIC SERVICE dialog box opens.
- In the Dynamic service name field, enter a name for the service.
- Click ADD. The new service appears in the selected folder.
After you create a dynamic service, add members to it. See Add members to a dynamic service.
Note
Service and folder names must be unique within their folder.
Edit or delete a dynamic service
You can edit, clone, or delete an individual dynamic service, or manage folders in the Services panel.
Edit, clone, or delete a service
To edit, clone, or delete a dynamic service, use the vertical ellipsis (⋮) menu next to the service in the Services panel.
- In the Services panel, select DYNAMIC SERVICES.
- Click the vertical ellipsis (⋮) next to the service you want to manage. A menu appears with the following options: Edit, Clone, and Delete.
-
Select one of the following options:
-
To edit the service, select Edit. The EDIT DYNAMIC SERVICE dialog box opens with the following fields:
Field Description Name The display name of the service. Must be unique within its folder. Description An optional description of the service. Make your changes, then click SAVE.
-
To clone the service, select Clone. A copy of the service is created in the Services panel with the same description and members as the original. Impact policies are not cloned.
-
To delete the service, select Delete. A confirmation dialog box appears with the message "Delete 'service name' service -- Are you sure you want to delete this service?" Click DELETE to confirm.
-
Add a subfolder, edit, or delete a folder
To manage folders in the Dynamic Services list, use the vertical ellipsis (⋮) menu next to the folder in the Services panel.
- In the Services panel, select DYNAMIC SERVICES.
- Click the vertical ellipsis (⋮) next to the folder you want to manage. A menu appears with the following options: Add new folder, Edit, and Delete.
-
Select one of the following options:
-
To add a subfolder, select Add new folder. Enter a name for the folder and click ADD.
-
To edit the folder, select Edit. Make your changes, then click SAVE.
-
To delete the folder, select Delete. A confirmation dialog box appears with the message "Delete 'folder name' folder -- Are you sure you want to delete this folder? All the services & folders will be deleted from this folder." Click DELETE to confirm.
-
Add members to a dynamic service
Members are the entities that make up a dynamic service. Adding members allows Services to monitor their health and include them in impact analysis.
- In the Services panel, select DYNAMIC SERVICES and select the service you want to update.
- In the Services canvas, click +ADD MEMBER. The ADD MEMBER dialog box opens.
- In the Search field, enter the name or type of the entity you want to add. You can search by device or component name, component type (such as interfaces or OS processes), or group type (such as location or system). As you type, matching results appear automatically.
- In the left panel of the dialog box, select a result to display matching entities in the Search Results panel.
- In the Search Results panel, select the entity you want to add as a member.
- Click ADD. The new member appears in the Members list.
Editing impact policies
Impact policies control how a node's state changes propagate to parent nodes in the dependency graph. You configure impact policies on individual nodes directly in the Impact view.
The IMPACT POLICY dialog box shows the node's current actual state and derived state, and provides sections for configuring contextual and global policies. The options available depend on the node type:
- Dynamic service nodes: Contextual and global policies, and the Suppress service events option.
- Logical node nodes: Contextual and global policies only.
- CZ entity nodes: Contextual and global policies, and a Custom State Provider.
Impact policies for Availability and Performance are configured separately. Use the A and P buttons to switch between health types before opening the dialog box. The policy names reflect the selected health type: for example, selecting A shows Contextual Availability Policy and Global Availability Policy, while selecting P shows Contextual Performance Policy and Global Performance Policy.
For background information on contextual and global policies, see State propagation policies.
Add or edit an impact policy
To add or edit an impact policy, open the Impact Policy dialog box in the node's vertical ellipsis (⋮) menu in the Impact view. The Impact Policy dialog box shows the selected node's current actual state and derived state, and provides sections for configuring contextual and global policies.
- In the Services panel, select DYNAMIC SERVICES and select the service you want to work with.
- Select the Impact view tab.
-
Click the vertical ellipsis (⋮) on the node you want to configure. A menu appears.
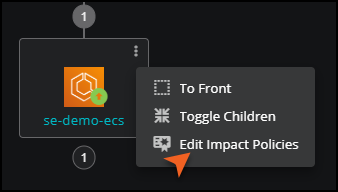
-
Select Edit Impact Policies. The IMPACT POLICY dialog box opens, showing the node's current actual state and derived state.
-
To add a contextual policy, click + Add policy in the Contextual Policy section. A contextual policy form appears. Update the policy fields as needed.
Field Description My state will be The resulting state for this node if the policy condition is met. For availability policies: Down, Degraded, At risk, Up. For performance policies: Unacceptable, Degraded, Acceptable. If The threshold condition that triggers the policy. Select % to specify a percentage rather than an absolute value. Of type The type of child node the policy applies to. Select Any to apply to all child node types. Other types are exclusive. Are The state of child nodes that triggers evaluation of this policy. For availability policies: Down, Degraded, At risk, Up. For performance policies: Unacceptable, Degraded, Acceptable. -
To add a global policy, click + Add policy in the Global Policy section. Complete the Global Performance Policy form using the same fields as the contextual policy.
- Optional: If this is a dynamic service node, enable the Suppress service events option to prevent state changes on this node from generating service events. Use this option when a node is used solely to group child nodes.
- Optional: configure a custom state provider.
- Click SAVE.
Configure a custom state provider
Use a custom state provider to define state triggers for CZ entity service model members based on a specific event class. This is useful when you need to capture state data from events that belong to classes other than the defaults.
To configure a custom state provider, open the IMPACT POLICY dialog box and expand the Custom State Provider section.
- In the Services panel, select DYNAMIC SERVICES and select the service you want to work with.
- Select the Impact view tab.
- Click the vertical ellipsis (⋮) on the node you want to configure. A menu appears.
- Select Edit Impact Policies. The IMPACT POLICY dialog box opens.
- Expand the Custom State Provider section.
-
Update the fields as needed. The following table describes the available fields.
Field Description Event Class The event class to monitor for this node. You can configure one event class per node. Critical The state to assign to this node when a Critical severity event occurs. Error The state to assign to this node when an Error severity event occurs. Warning The state to assign to this node when a Warning severity event occurs. Info The state to assign to this node when an Info severity event occurs. Default The state to assign to this node when a Default severity event occurs. Clear The state to assign to this node when a Clear severity event occurs. Apply to The scope of nodes to which the state override applies. Options are: This node only; Nodes of the same type on the same device; Nodes of the same type in the same device class; Nodes of the same type system-wide. -
Click SAVE.
Delete a policy
To delete a policy, open the Impact Policy dialog box and remove the policy from the node.
- Open the IMPACT POLICY dialog box for the node.
- Click the delete icon next to the policy you want to remove.
- Click SAVE.